Let's learn how to embroidery this beautiful Ocean Flow table runner using designs from the Reflections of Nature Embroidery Collection! This fun Quilt As You Go project will be easy and fast to create using your embroidery machine to stitch all of the blocks:
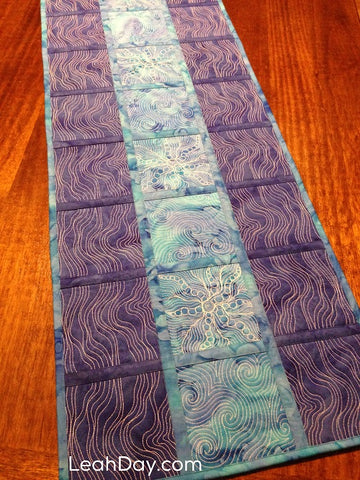
The finished size of this machine embroidered table runner is 12 3/4 x 46 3/4 inches.
Materials
½ yard dark blue fabric (Island Batik Blueberry)
½ yard light blue fabric (Island Batik Waterfall)
*4 yards backing fabric
36-inch of batting - Quilters Dream Poly in the Request thickness (lowest loft)
White Isacord Polyester Embroidery Thread
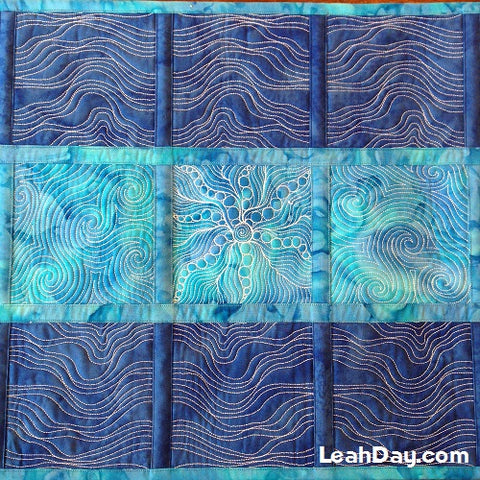
Designs Flowing Lines, Ocean Currents, and Brittle Starfish from the Reflections of Nature Embroidery Collection. You will need the ability to flip designs vertically on your embroidery machine.
*Note - This is an estimated amount of backing fabric for this project.You may need more fabric if you are using a larger hoop.
Instructions
Note: Instructions are designed for small hoops able to only stitch one design at a time. If you have a larger hoop, you may be able to fit multiple designs within one hooping. Just be sure that you are leaving at least ¼ inch between the designs so they can be trimmed and connected together properly.
Fabric Preparation and Cutting
Prewash, starch, and press all fabric prior to cutting.
Slice backing fabric into pieces large enough to fit into your embroidery hoop.
Cut the batting into 33 - 5-inch squares.
Cut the darker blue batik fabric into 22 - 5-inch squares.
Cut the light blue batik fabric into 11 - 5-inch squares.
Embroidering the Designs
Hoop and stitch the following designs with white Isacord polyester thread:
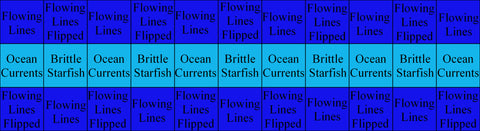
Dark blue batik fabric - 11 blocks of Flowing Lines
Dark blue batik fabric - 11 blocks of Flowing Lines - Flipped vertically - This will create the beautiful continuous flowing line effect through the table runner!
Light blue batik fabric - 5 blocks of Brittle Starfish
Light blue batik fabric - 6 blocks of Ocean Currents
Trim all blocks to 4 ¼ inches square.
Connecting the Embroidered Blocks
The embroidery blocks are now connected together using binding strips to create the table runner.
Prepare the Binding Strips
Cut 30 - 1 x 5-inch binding strips in dark blue
Cut 20 - 1 ½ x 5-inch binding strips in dark blue, fold in half widthwise and press.
Cut 10 - 1 ½ x 5-inch binding strips in light blue, fold in half widthwise and press.
Cut 2 - 1 x 48-inch binding strips in light blue fabric
Cut 2 - 1 ½ x 48-inch binding strips in light blue, fold in half widthwise and press
Cut 3 - 2-inch outer binding strips in light blue fabric. Connect together using a diagonal seam and fold in half widthwise and press.
Arrange the embroidered blocks according to the diagram below:
Follow the steps below to connect the blocks together in rows.
 |
Stack a 1 inch strip on the bottom, the edge of the block in the middle, then the raw edges of the folded 1 ½ inch strip on top. Stitch through all layers with a ¼-inch seam allowance. |
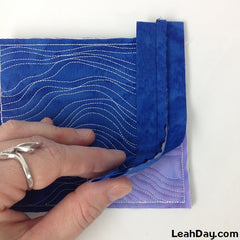 |
Fold over the back binding and flip the next block right side down. Stitch the back binding to the wrong side of the next block with a ¼-inch seam allowance. |
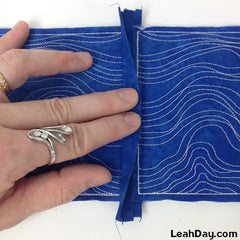 |
Unfold the blocks and the seam allowances should nest nicely together in the grove created by the back binding. Finger press the top folded binding over to encase the raw edges of the embroidered blocks. |
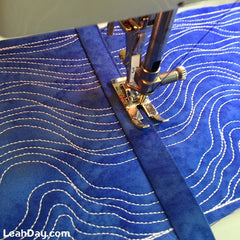 |
Edge stitch along the binding fold to secure. |
Connect all the blocks together into rows, then use the long strips to connect the rows together to form your table runner. Bind the outer edge of your table runner with the 2-inch wide connected binding strips. Click Here to find a video on binding by machine.


