 We're on the home stretch of our machine quilt binding adventure! By attaching your quilt binding entirely by machine you'll be able to secure the edges quickly and be wrapped up on the couch with your quilt by the end of the day. I've created a three part quilting tutorial to guide you through every step of the process.
The steps to quilt binding by machine:
1. Preparing a Quilt for Binding by Machine
2. Create the Binding and Stitch it to the Quilt
3. Finishing the Binding by Machine
At this stage of the game, your quilt is looking great and you no longer have a massive strip of binding to mess with. It's been stitched and secured to the wrong side of your quilt.
Why the wrong side?
We stitched the binding strip to the wrong side so we can fold it around the edge of the quilt and stitch it down from the right side. This way the right side of the quilt is facing up and will look the best when this stitching is complete.
But what will the back side look like? Umm...
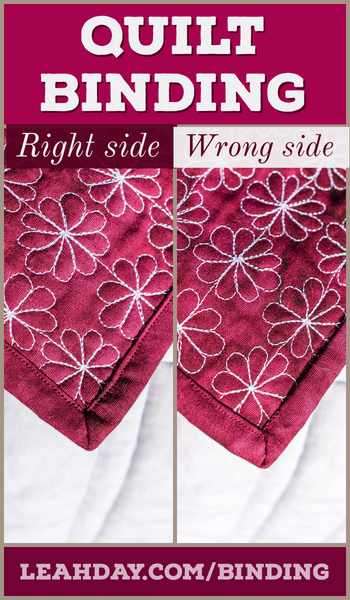
This is the thing about stitching binding entirely by machine - yes, it's faster. Yes, it's a bit easier, especially if hand stitching isn't your favorite thing to do.
But there are always sacrifices in quilting and by speeding the process up and stitching the binding down with your sewing machine, you will not be able to control how this stitching looks on the back of your quilt.
If you've followed the instructions for preparing your binding and stitched it on accurately with a 1/4 inch seam, theoretically your stitching to secure the binding from the front should look pretty good on the back too. But it won't be perfect and I want you to know that you might see this stitching wiggle a bit on and off the binding on the back side of the quilt.
If this sends you into a fit of hives at the very thought, please understand you can also finish this folded edge by hand. It will take more time, but that's the only way to ensure your binding will be secured and look perfect on both sides.
You could also plan ahead when you plan to bind a quilt like this. If you use the same fabric for your quilt backing and quilt binding, and match your thread color, there is no way you'll be able to see the stitching on the front or back of the quilt. If you can't see the stitching because it blends in perfectly, then what does it matter?
It's easy to start obsessing about things like this, and I'll be honest - I've never met someone that obsesses about every detail that also has a lot of finished quilts. If you nitpick everything, you're probably not going to get very much done.
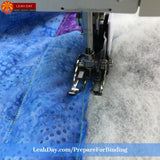
Okay, time to step off my soapbox! Learn how to stitch down and secure your binding in this video quilting tutorial:
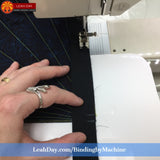
Yes, wearing quilting gloves can really make a difference when binding your quilts! Click Here to find my favorite quilting gloves.
Would you like to make the Rainbow Log Cabin quilt with me? That's the quilt we're binding together in this machine binding tutorial. Click Here to find this quilt pattern in the book Explore Walking Foot Quilting with Leah Day.
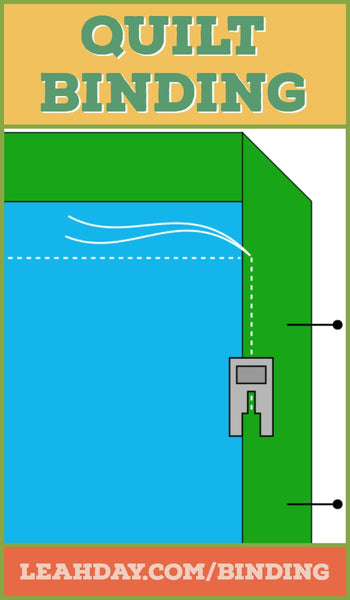
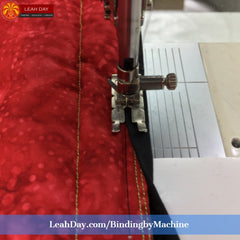 Stitching the Folded Edge of the Binding
Flip your quilt over so the right side faces up and fold the binding up to the front of the quilt so the fold in the binding reaches the stitching line 1/4-inch from the edge. I went into detail in the video about giving your binding a good finger press before folding it over the edge of the quilt.
You could also press the quilt with a hot, dry iron too. Just be sure to use a pressing cloth between your iron and the quilt.
Next take a minute to select the stitch to secure your binding down. I like to use a straight stitch here because it's fast and I like the look of it. But many quilters like to use a zigzag stitch or blanket stitch instead because it adds more thread and therefor more security to the binding and edge of your quilt.
No matter what type of stitch you use, be sure to test it on a piece of scrap fabric. Adjust your stitch length and width until you produce a nice sized stitch that will lock the binding in place. Don't test this on your quilt unless you'd like to spend the next 30 minutes ripping out ugly stitches!
Personally I use a straight stitch set at 1.5 mm stitch length. If I use a blanket stitch or zigzag, I generally set it to 1.5 mm long x 2 mm wide, but please test to see what you like best.
Preparing the Corners
For years I would hand stitch along the entire mitered corner of the quilt front and back. These days I rarely bother stitching the corner folds down unless I'm binding a show quilt.
Instead I begin by stitching down to opposite sides of the quilt, and I begin this stitching slightly off the corner. This flattens out the binding and creates half the 45-degree angle for our miter at the same time.
If you really want to save some time, leave your thread tails to start and end these lines of stitching nice and long. You can use those thread tails to stitch the binding corner and get it nicely folded over and secured as you can see in the video tutorial.
The last step is to fold over the two remaining sides and stitch them down. When you get to the end, leave long thread tails, tie them in a knot and bury in the middle of your quilt.
That's it! You've bound and finished your quilt in a single day and now you can go curl up on the couch or in bed with your beautiful creation, or build a tent in your living room, or spread it out over your kitchen table for a table cloth.
The wonderful thing about creating quilts is all the fun things you can do with them after they're finished! Make sure to check out the other binding tutorials I've created so you'll always be able to bind your quilts quickly and easily and entirely by machine:
|
|
|
Finishing the Binding |

If you enjoyed this quilting tutorial, I think you'll love taking a quilting class with me too!

The best quilting class to take if you're a beginning quilter is the Mega Star Walking Foot Quilting Workshop. This class walks you through the entire process of creating a big throw quilt entirely on your home sewing machine.
You'll learn how to piece the Mega Star quilt top, how to plan your quilting design, and how to quilt this large throw sized quilt with walking foot quilting and three fun quilting designs.
I enjoyed teaching this workshop because it pushed me to piece and quilt a big quilt very quickly. I challenged myself even more with walking foot quilting and using Minky fabric on the back of the quilt, which made it feel very different from my other quilts. This is now my favorite quilt to curl up with on the couch. I hope you love making this quilt too and learning more about every step of the quilting process with me.
Click Here to read more about the Mega Star Walking Foot Workshop.
Let's go quilt,
Leah Day


