I've just recently expanded my frame to 12 feet and need to insert Red Snappers longarm clamps on a new set of cloth leaders. See ALL the steps to sewing and installing the new leader cloth in this video:
Tools and supplies from this tutorial:
|
|
|
|
|


Note - Our Grace Company rolling rail frames come with leader cloth to fit the length of frame you order. So if you order a 10 foot frame, you will receive 10 foot leaders. If you later expand your frame with a 2-foot extension, you'll receive a 2-foot length of leader cloth to sew to your original leaders. I personally don't like this, so I recommend ordering a new pack of leader cloth to fit the new length of your frame. Click Here to contact us for help ordering new leader cloth.
Fold and Sew the Gusset or Casing
I folded over the dashed edge of my leader cloth (opposite edge of the Velcro) 1-inch.
I then stitched 3/4 inch from the folded edge. This created the perfect sized tube of fabric (which can be called a gusset or casing) to slide the Red Snapper tubes inside.
TIP - Use contrasting thread when stitching your gusset. I use this stitching line every time I load my frame to align my backing fabric and the contrasting red thread makes this much faster!

Red Snappers now come in a smaller package, and the tubes connect together with simple dowel rods. Put together enough tubes to extend beyond the edges of your leader cloth by 2-3 inches.
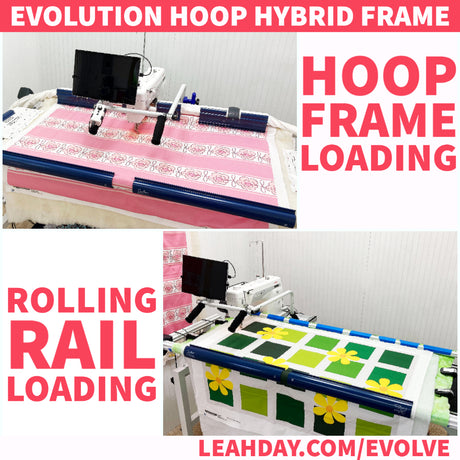
Hoop Frame Note - I don't use Red Snappers on my Hoop Frame. I tried it and ended up having to rip the gusset back out of the leader cloth because it didn't work, didn't save time, and ended up making the quilt more tricky to move around on the frame. I only use Red Snappers on my rolling rail (Continuum) frame.
Not sure which type of frame you have? Try to roll the front and back rails. If the rails roll around, you have a Rolling Rail frame. If they don't, you have a Hoop Frame.
Installing New Leader Cloth on Your Rolling Rail Frame
This part confuses a lot of quilters. We can get stuck on doing this "right" and a bit confused when our frame doesn't look like the diagram in the manual or a picture online.
Focus less on getting it "right" and more on how it works for you! I shared how my leader cloth is installed in the video:
Bottom, Front Rail - longest leader cloth installed right side down.
Top, Back Rail - medium leader cloth installed right side up.
Batting Rail - shortest leader installed right side up.

This is just what is working for me right now. Keep in mind, I'm using Red Snappers, an Idler and Batting Rail, and I use Quilt Clips when floating a quilt top.
If you're not using these additional accessories, you may find the leaders work better in a different arrangement, or facing a different way (right side up or down, etc).
The key is to figure out what works for you. And what is the whole point? To install your backing fabric to the frame securely, right side down. That's it!
Now if you'd like to see more steps to loading a quilt including installing the batting and quilt top, Click Here to find my most recent rolling rail loading tutorial.
Let's Go Quilt,
Leah Day
Tools and supplies from this tutorial:
|
|
|
|
|