Would you like to learn how to make bell-bottoms or flare leg pants? In this sewing tutorial we'll take an existing pair of blue jeans and quickly turn them into bell-bottoms!
Shop for machines, feet, and tables to make sewing easier!
Gather Supplies to Sew Bell Bottom Pants
Here's a list of the materials I used to sew my flare leg pants. This is a lot easier to sew using jeans you already own and simply modifying the leg. Make sure to follow the directions on the pant length to get the right bell-bottom effect!
Materials:
- Blue jeans that fit nicely in the hip and waist and are a bit long in the leg. (Skinny jeans will work, but only if they are long enough to drag the ground when finished. If your pants are not long enough, you can always add an extender to the ends as you saw in the video.)
- Fabric to create the bell-bottom effect. Select a thicker feeling fabric like denim or upholstery weight fabric for the best results.
- Navy blue cotton sewing thread
- Pins
- Ruler
- Sewing tape measure
- Freezer paper to create the template
- Contrasting cotton sewing thread for decorative stitching.
How to Make a Bell-Bottom / Flare Pants Pattern
We're creating a sewing pattern from scratch - exactly the size and shape you desire. This is a great skill to have and a good first step to designing your own sewing patterns!

- Decide how big of a bell you want and measure up the outside seam of the pants. Mark this point on both pant legs with a pin, then rip the seam on both legs to this point.
- Decide how wide you want the bell-bottoms / flare to be. My bells ended up 10 1/2 inches long by 4 inches wide, which created a subtle flare in the leg.
- Now we will create a template, and I've included a picture of mine for reference. Press two pieces of freezer paper together to create a stiff template (or grab a large sheet of cardstock), then mark a straight line down the middle. Mark a line at the bottom perpendicular to the first the width that you wish the bell to be (4 inches).
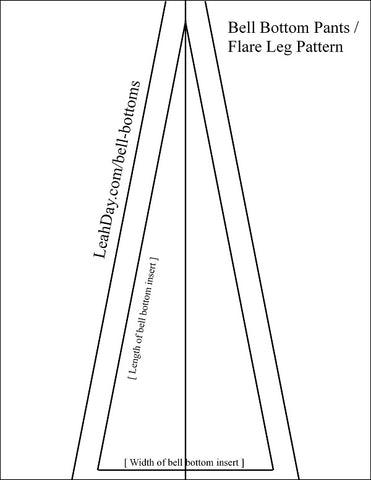
- Now measure from the end points of the perpendicular line up to the center line the length that you have ripped your pants (10 1/2 inches) to create a triangle.
-
Don't forget seam allowance! If you don't add seam allowance to your pattern, your bell bottom flare will be smaller than you wanted. To add seam allowance, add 1/2 inch inch to the lines on both sides and an additional 1/2 inch to the top and 1 1/2 inches to the bottom. It's always best to have more space to the top and bottom if you need it.
- Cut out your bell bottom pattern. You have just created your first sewing pattern and you're ready to sew your pants!
How to Sew Bell-Bottom / Flare Pants
- Cut out two pieces of fabric using your pattern. It's best to use fabric that's similar in weight as your pants, but you definitely can use weird materials here too.
I once cut up raincoat and used it as the inserts on a particularly large pair of bell-bottoms. They worked great when it was wet outside, though eventually the plastic material ripped away from the jeans.
- Align the triangle of fabric right sides together with the opening in your pant leg. Stitch from the pant hem with a 1/2-inch seam allowance, making sure to backstitch at the beginning and end of your seam.
- When you reach the tip of the triangle - the "V" created in the pants - take a minute to realign your fabric. Make sure the insert triangle fabric is aligned right sides together with the opposite edge of the pants. Smooth out the layers and stitch the remaining seam from the "V" to the pant hem.
- Finish your seams as desired. Jean material really likes to fray so either serge or zigzag the edges to reduce fraying.
How to Extend the Leg of Your Pants
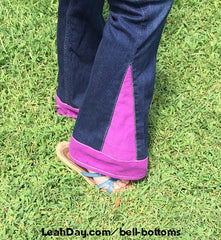
If you slip on your bell-bottoms and find they look weird (like the worst type if high-water pants you've ever seen) then they may be too short.
Bell-bottoms look best when the pants arch out from the knee or calves of your legs and fall to the ground to cover your feet completely.
To extend the length of your pants, slice off the hem and follow the instructions in the video to add a length of fabric. Make sure to follow the steps to angle the fabric join so the fabric extender also flares subtly out from the leg, following the angle created by the bell-bottom insert.
I added an additional 4 inch strip of fabric and sewed it to the bottom of the pants with a 1/2 inch seam allowance, then turned up the hem 3/8 inch.
Add Decorative Stitches for a Special Finish
To finish the bell-bottoms I stitched around the flare and extender with a decorative triple stitch and contrasting thread. It's a good idea to test your decorative stitches before trying them out on thick fabrics like these.
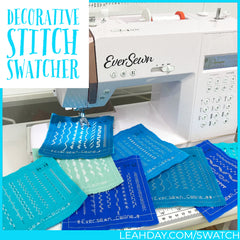
I recently created a new tool for this - the Decorative Stitch Swatcher! This tool helps you test multiple decorative stitches on a small scrap of fabric. You can adjust your stitch length and width until you find the perfect look.
This will save you lots of time and fabric! Decorative stitches like to get messy on thicker fabrics like jean material. Swatching is the best way to know how a stitch works and if it will work with your sewing project. Click Here to find the Decorative Stitch Swatcher!
I hope you've enjoyed this sewing tutorial so you can create bell-bottoms or flare pants. It's always nice to take a pair of pants that might have gotten too short or too worn on the bottom and transform them into funky bell-bottoms or extend the life with a little flare on the bottom edge.


