One of the most challenging steps when planning and building my she shed Crafty Cottage was figuring out how I would insulate the shed floor. Insulating the walls would be simple because they were exposed to the inside and insulation batting could easily be squished between the studs.
Figuring Out How to Insulate the She Shed Floor
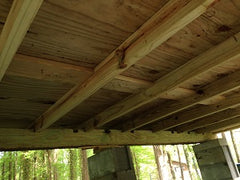
The floor was a different story because I wasn't sure initially how I would be able to access this area. When I toured the building store and picked out my she shed I wasn't able to see underneath it so I couldn't tell if the studs were exposed on the bottom or covered with another layer of plywood.
Looking back, I should have asked more questions and requested a diagram of what the studs looked like on the bottom of the shed. Once the shed was delivered I found the floor was made from 2 x 4 studs set 16 on center.
Thankfully we'd had the shed installed high enough that I could easily crawl under and install batting from the bottom. Inside the barn I also found that I had 1 5/8 inch of space between the floor and the bottom of the door which would allow for some thin insulation to be installed on top of the floor.
Ultimately I knew I wanted to insulate the floor very well. I tend to be cold year round and plan to heat the building with a small electric base heater. I want to make my craft shed as well insulated as possible to make the best use of my heater in a small space.

Picking the Insulation
No, I don't have a lot of experience with insulation, other than knowing which type I didn't want to work with. I've had plenty of experience with fiberglass to know how irritating it can be to my skin. I wanted to stay as far away from that type of insulation as possible.
I found a lot of helpful YouTube videos on insulating crawlspaces and exposed floors that helped me understand how different types of insulation were installed.
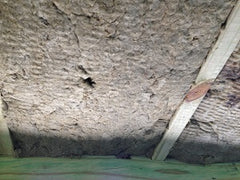
I ended up choosing Roxul Comfort Batt which has an R15 insulation rating and is made from stone wool and recycled metal. This batting is designed to be tucked between 2 x 4 studs and does not require any extra material to finish the surface. The batting holds its shape and will not sag out of the cavity.
What sold me on this batting in particular is the sound proofing quality it has. I'm planning to use my new craft room for filming videos and I'd prefer not to have the clucking of chickens or barking of dogs interfering with my videos.
I was skeptical about installing insulation and leaving it exposed to the elements. I could just imagine little critters building a nest up in my insulation and creating a big mess and bad smell over time.
So I decided to install the Roxul insulation and cover it with a layer of fiberglass screen wire which would block unwanted critters and keep the area under the shed very clean and easy to maintain.
Installing the Insulation Under My She Shed
This wasn't a fun job, but it didn't take as much time as I expected. I picked up two packs of Roxul Comfort Batt and began cutting the pieces to fit around the big beams that ran the length of the barn. This insulation is super easy to cut with a cheap serrated bread knife from the grocery store.
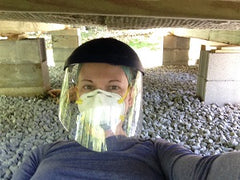
To protect my hands I wore rubber gloves and long sleeves while working with this insulation. I also kept a respirator and a face shield on to keep the batting from falling into my face and eyes. It definitely doesn't make you as itchy as fiberglass batting, but it still can irritate your skin if you're not careful.
I cut all the pieces I needed using a simple tape measure and lined them up under the barn so I could easily grab each piece and install it without having to crawl out between pieces.
Crawling under the barn would have been a lot easier had I remembered to lay down cardboard! Even though I always have tons of cardboard on hand from the business, I just didn't think of it. I used my son's sleeping bag instead and ended up black and blue and very sore from crawling around on my back over the gravel.
Still, it didn't take much time because all you have to do is squish the insulation between the studs, press a bit to get it flush with the level of the studs and let go. There's no nailing, stapling or any extra steps so I quickly insulated more than half the area in about thirty minutes.
Securing the Insulation with Fiberglass Screen
I originally purchased 72-inch wide fiberglass screen wire, but immediately returned it when I was told a helpful tip. The more narrow rolls of screen wire are far easier to control and maneuver and you can overlap them to cover any area. Working with the super wide roll would have been very challenging and I doubt I would have been able to cover the area so nicely.

Using 3/8-inch stapes, I secured the screen wire to the studs every 5 inches or so. As the wire was installed, it became a lot easier to work under the barn because it reduced the amount of dust and particles that naturally fell from the Roxul batting every time I brushed against it.
Yes, this was a dirty, tiring job, but it got easier as I moved from underneath the shed to the edges. With the screen wire all installed, I could finally put the under-the-shed portion of this project behind me.
Click the images below to learn more about how I converted a prebuilt she shed into my craft room, the Crafty Cottage:
Find more articles about sewing, quilting, and fun projects to try!


