We're down to the finishing details inside the Crafty Cottage! For the past three days we have been busy painting the walls, ceiling, and loft. It's amazing how the light colored paint transformed the space and suddenly made it feel like a nearly finished room.
Painting the Craft Room
We used three gallons of Kilz Primer to cover the beadboard paneling and more than twelve tubes of caulk to fill in all the gaps and spaces. Beadboard is hard to cut and install perfectly so if you use it, be prepared to do some extra work filling in all those little gaps left over.
Once the primer went on, the wood surface became really splintery and rough. We lightly hand sanded the walls with 80 grit sandpaper to smooth out the roughness, and when the paint went on, the walls were once again smooth and soft.
As for the length of time, the priming and painting took three long days, despite an electric paint machine being utilized, which pumps the paint from the bucket directly into the roller. On Tuesday the walls were primed , Wednesday a bit more caulk was added to places missed and the walls were sanded, then Thursday the walls were painted with Valspar latex paint.
We did have an issue with paint fumes because it suddenly began raining right in the middle of our painting week and we had to keep the door and windows closed. We moved fans and a dehumidifier into the space to help dry it out and reduce the odor, but this was an issue until the weather cleared and we could open the window and let the craft room air out. Craft Room Lights
One of the most expensive things about the Craft Cottage was the lighting and electricity. Having great lighting was essential for me to enjoy the space and use it for making great craft videos.
I picked the two big fluorescent lights to install in the ceiling and underside of the loft. I know what you're thinking - fluorescent? No!
But the style of fixture is not the issue, it's the type of bulbs you choose. We're using four T-8 daylight bulbs in each fixture and the lighting is crisp and bright without the yellow / green glare common in bright fluorescent bulbs.
Yes, I'm super pleased with this lighting!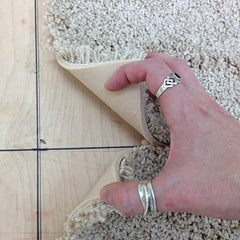 Installing Carpet Tile
One of the hardest choices for the cottage was how to finish the floor in the craft room. I really prefer carpet, but I didn't want to mess with a carpet stretcher or having to pay for professional installation. After a bit of research, I found carpet tiles, which are easier to install, durable, and can be easily switched out if one gets damaged.
Actually GETTING the carpet tiles was an adventure because in my area they were only available by special order, which would have take a week or two longer to arrive. I went online and began searching Amazon, then Ebay and found a company that keeps carpet tiles in stock and ready to ship.
When we began to install the tiles, we did have a few issues. The carpet is mounted to a foam backing, but it's rarely cut exactly square. As we began sticking them to the floor, it was a struggle to keep the edges straight and line everything up square to the walls without getting gaps.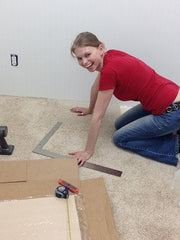 The tiles were interesting because they didn't seem super sticky when you first peel off the plastic backing. When you place them on the floor, however, they suddenly become so stick they're hard to peel up and reposition.
After a bit of practice we got the hang of placing the tiles together and smoothing the edges together at the same time so the pile wasn't squished by the next tile. It also wasn't very time consuming. We knocked out the tiling job in about 45 minutes working together.
After vacuuming, all the tiles blended together to make one solid effect over the whole room.
With the paint, lights, and carpet in place the craft room is complete! Click the articles below to learn more about how I converted a prebuilt shed into my craft room, the Crafty Cottage:
 Picking the Shed |
 Shed Delivery |
 Insulating the Shed Floor |
 Wiring & Paneling |
|
Electricity! |
 Paint, Lighting, and Carpet |
 Organizing the Craft Room |
 Budget |


