 Preparing the Ground for a Prebuilt Shed
I wasn't required to make any special preparations for the shed to be delivered to my back yard. If you're setting up a similar building, make sure to check with your local building administration and neighborhood covenants as to what you'll need to do to the ground before you have your building delivered.
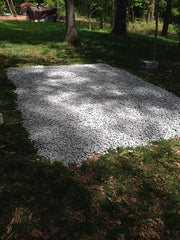
Controlling moisture from the ground is high on my priority list for this project. We're placing the shed / craft room in a wooded area of my back yard where the ground gently slopes down a hill. The weakest part of a prebuilt barn is the bottom side because it has the greatest chance to rot from exposure to water from the ground.With this goal in mind, we first spread out a layer of 4 mil black polyurethane sheeting to act as a vapor barrier and stop grass and weeds from growing up under the barn. I cut the plastic 10 feet x 14 feet so it would extend beyond the barn by one foot on all sides.

Next I headed to a local landscaping store and picked up a scoop of gravel. A single scoop was a huge amount of gravel and totally filled my small, two wheel drive truck. I'd never picked up gravel before and the weight seriously affected the way my truck drove on the way home.
I kept expecting the axle to split in half or the back end of my truck to fall off! Later I realized I was being worried for no reason and there was no risk to my truck, but it's good to understand just how heavy a scoop of gravel will be. We carted the gravel down to the site and spread it evenly over the black plastic sheeting. It ended up taking two scoops of gravel to cover the entire area, but the cost was quite low at only $40 per scoop in my area.
We also picked up several solid and hollow concrete blocks, but not knowing where they needed to be set up, we kept them to the side and ready for the shed to be delivered.
Prebuilt Shed Delivery
We had extremely rainy weather for many weeks and our yard was so wet knew the delivery truck would get stuck if they tried driving on our wet grass. This delayed our shed delivery for a few days, which was nice because it allowed us plenty of time to prepare our site and spread gravel.
When the big day finally arrived, we moved our vehicles out of the way so the big truck would have plenty of room to maneuver the shed into the yard. Turns out, we probably didn't need to worry about it so much because the big truck never entered our gate!
The delivery guy shifted the entire building onto a hand held forklift with attachable wheels on one end and wheeled it into our back yard like a wheel barrow. It was a super easy delivery and he was able to place the shed exactly where we'd prepared the site.
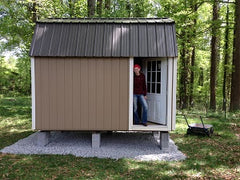
The delivery guys took their time positioning both solid and hollow concrete blocks and leveling the building, and in about 10 minutes it was complete.
When I posted this photo to Facebook a lot of people asked why we set up the building so high on the concrete blocks. The main reason was I wanted to easily access the area underneath the barn so I could add insulation under the shed.
I was also advised that lifting the barn higher would reduce the chances that the floor rot out from moisture damage. So we installed the shed on two hollow 8 inch blocks and one solid 4 inch blocks making the shed a total of 20 inches off the ground.
Building the Deck and Steps
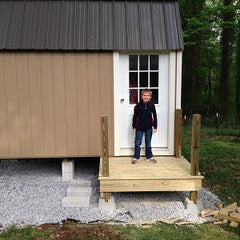
Of course, this height now required us to build some steps and a little deck off the front. Already I was able to see that certain decisions could easily add extra steps and cost to the project. This tiny deck and steps added another $200 to the project. Josh was more in favor of purchasing prefabricated steps or using concrete blocks.
I liked the idea of building a small deck better, mostly because we couldn't be guaranteed that prefab steps would reach the door without a weird gap or slightly higher step at the top. The last thing I wanted was to twist my ankle stepping out of my shed onto steps that always felt awkward.
We prepared the deck and front area by spreading more black plastic and one final scoop of gravel, then a hired contractor took over the deck and steps project, setting up treated 4 x 4 posts in prebuilt concrete deck forms and 2 x 8 treated planks to form the 4 foot x 5 foot landing. He used 5/4 deck boards for the deck surface and cut out the steps from a 2 x 12 board. The most time consuming part of building the deck was finding all these materials in Lowes Hardware.
This extra project took the guy a day and a half to knock together. After we've finished the inside of the shed and moved all my craft gear into the room we will finish the railing around the top landing.
Ultimately setting up the site took far less time and was far less complicated than I expected. The site was prepared in just a few hours and the deck was complete with a few days. Because the building was prebuilt and complete, we could store our tools right inside to keep them handy during this project.
My biggest takeaway from this leg of the project is not to get overwhelmed by the idea of a task. I thought shoveling gravel from the truck and carting it down to the site was going to take HOURS. It ended up taking only 30 minutes with two people working at it steadily. It was a good lesson to realize that some jobs are just not as hard as they seem and to always approach the project with an open mind.
Click the articles below to learn more about how I converted a prebuilt shed into my craft room, the Crafty Cottage:
 Picking the Shed |
 Shed Delivery |
 Insulating the Shed Floor |
 Wiring & Paneling |
|
Electricity! |
 Paint, Lighting, and Carpet |
 Organizing the Craft Room |
 Budget |


