Over the last several weeks we've transformed a basic prebuilt shed into a beautiful craft room and now this conversion is finally complete! It's time to move in to my new space and get things organized so this space is fun, functional, and easy to work in. Here's a video to showcase the transition from one space to another:
It ended up taking a week to get everything moved in and set up properly. As you can see from the video, it's such a brighter, lighter space, and absolutely perfect for filming new quilting videos!
 Organizing the Craft Room
Originally I'd planned to transplant my current quilting setup out to the new cottage with virtually no changes in equipment or furniture. When I got some of the tables and furniture in the craft room, I realized I would have a 4 inch gap between my tables and the walls and my quilts would easily fall right in that gap and get snagged. It would also look weird, so this had to be changed!
I decided to build a new table, supported on three sides by the wall. This new table would surround my flatbed sewing table and create a wonderful flush surface from the machine to the walls on all sides.
At Lowes I found a melanine board - basically compressed particle board with a white, laminate coating on both sides. This stuff is SUPER heavy, but also very durable and flat - perfect for a new sewing table!
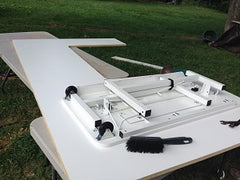
 Back at home, we used my sewing table as a template to cut out a rectangle from the center. We used a miter saw to cut the straight cuts and a jigsaw to cut the curves for the table corners.
Almost nothing was wasted from this board because I was able to use the cut chunk from the center along the right side to form a perfect "L" shaped table around my chair. I still have a bit of a gap between the two table tops, but this will get filled with caulk so the seam between the tables won't be noticeable.
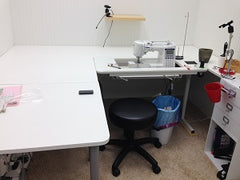
I installed this new table in the main part of the craft room and supported it on three sides with 2 x 2 boards screwed to the walls. The front of the table is supported by adjustable KAJ legs from IKEA. if you don't have an IKEA nearby, you could always cut legs to the exact size from a 2 x 2 board instead.
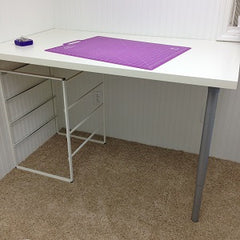 The height of the table fits perfectly with the sewing table and I have plenty of space underneath for storage. I bet many machines are going to find a new home underneath!
To the right side of the machine, I like to keep a set of drawers I found at Michaels to organize thread, tools, bobbins, feet, and all the other junk that comes with sewing machines - screwdrivers, oil, etc.
On the back wall of the Crafty Cottage I've set up a small table for fabric pressing and cutting at around 33 inches high. The increased height does make these tasks easier and the space underneath will be used for more storage.
So that's it for this transformation! It's been a wonderful experience and I absolutely love my new bright, well organized space. I still have some small odds and ends to finish up and then a final clean out of all the tools that will finish this project out for good.
Click the articles below to learn more about how I converted a prebuilt shed into a beautiful space for quilting, sewing, and making beautiful things:
 Picking the Shed |
 Shed Delivery |
 Insulating the Shed Floor |
 Wiring & Paneling |
|
Electricity! |
 Paint, Lighting, and Carpet |
 Organizing the Craft Room |
 Budget |


