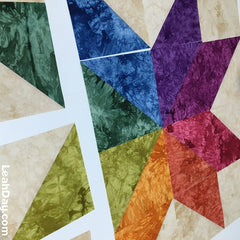
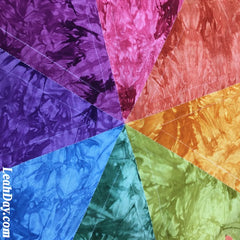
What can be better than piecing a super easy star quilt? How about creating two at the same time! Learn how to piece Twin Rainbow Star quilts in this free quilt pattern with Leah Day:

Twin Rainbow Star Pattern - Creates TWO quilts 32 inches square.
Are you looking for the free quilt pattern for the Twin Rainbow Stars Quilt? Click Here to download the free quilt pattern.
 Extra Quilting Tips and Tricks
The key with the Twin Rainbow Stars is to stack your fabrics and piece all the half square triangles carefully. Make sure to use a 1/4-inch patchwork foot so you can accurately stitch 1/4 inch away from both sides of the diagonal marked line on your square stacks.
If you have problems piecing and trimming your half square triangles, be sure to check out my book How to Piece Perfect Quilts for tips on preparing your fabric and improving your piecing.
This book covers all the steps to piecing quilts perfectly and matching every seam. If you're feeling frustrated by patchwork and just don't understand why your fabrics aren't matching up the right way, How to Piece Perfect Quilts will definitely help you better understand the piecing process and how to improve one step at a time.
Beginner Walking Foot Quilting Tutorial
So now that our quilt tops are pieced, how will we quilt them? The great news is the Twin Rainbow Stars quilts are perfectly sized at 32 inches to learn the basics of walking foot quilting! Learn how to begin machine quilting with stitching in the ditch and straight line quilting in this new tutorial:
To make machine quilting easier, I always wear quilting gloves to help me grip the quilt and control where it's going. I also place a free motion glider on the table top to help the quilt slide easily over the surface.
 When it comes to stitching in the ditch, the main goal is to stay right in the ditches, or seam lines between the fabric pieces so your stitches are nearly invisible. I always lower my stitch length to 1.4 mm so it produces tight, secure lines of quilting.
When quilting with your walking foot, you will need to rotate the quilt anytime you change direction. The walking foot feeds the quilt through the machine for you, but this means the direction you're quilting in always needs to face the front of the machine.
Unfortunately quilting on your home machine can feel very challenging if your machine isn't set up well for quilting. If the machine is set on a table top, you will have to pull it up and over the edges of the machine and the quilt will easily get caught on the edges of the machine and drag against you.
 Click Here to find an affordable sewing table that will get your machine on a flush surface with your table top so it feels much easier to shift the quilt as you machine quilt. You can expand the surface of this small table with folding tables so you have a large, flat surface to easily quilt even very large quilts.
After stitching the quilt in the ditch, I marked lines 1/2 inch away from the ditch lines and continued quilting with my walking foot along all the marked lines. This left beautiful open diamond spaces on the quilt that can then be filled with a variety of free motion quilting designs!
Free Motion Quilting Twin Rainbow Stars
We heard from lots of quilters since sharing the Twin Rainbow Stars quilt pattern and walking foot video and everyone wanted more videos! So here's a new series of videos to teach you how to quilt eight beautiful designs into each of the diamond spaces of this quilt.
Machine Quilting Design #1 - Ocean Currents
This first quilting design, Ocean Currents is super easy and fun to quilt and creates a beautiful lava-like texture when quilted over the red spaces. I machine quilted this design on a 1/2 inch scale and it filled the space in less than five minutes!
Machine Quilting Design #2 - Snake Paisley
We're free motion quilting the orange diamond shapes today and I decided to fill the space with a beautiful flame-like design called Snake Paisley. I machine quilted this design on a slightly smaller scale, but it still filled the space really quickly so be sure to give it a try today:
Machine Quilting Design #3 - Lemonade
Have you noticed that each design has been picked to coordinate with the color it's quilted into on the Rainbow Stars quilt? Today is no exception! Let's learn how to machine quilt Lemonade, the perfect design to stitch into the yellow diamonds on our quilt:
Machine Quilting Design #4 - Fern & Stem
We're machine quilting the light green diamond of the Rainbow Star quilt next so I looked for an easy design that would fill the space with flowing, leafy texture. Fern & Stem is a great choice because it's easy to quilt and fills the space very quickly with a beautiful flowing design:
Machine Quilting Design #5 - Flowing Feather Leaves
The Twin Rainbow Star quilt also had a darker green section and I decided to fill those spaces with another leafy, organic design called Feather Leaves. This design required a bit more travel stitching, but the texture it added to the quilt was simply stunning!
Machine Quilting Design #6 - Poseidon's Eye
We're quilting the blue diamond next so I had to pick a machine quilting design to correspond with this color. I decided on Poseidon's Eye, an easy design that looks like big spirals of water flowing together.
Machine Quilting Design #7 - Chain of Pearls
The purple and pink areas of the quilt were a bit tricky to pick designs. Obviously I could have quilted grapes or eggplants into the purple diamond, but looking at the quilt, I wanted a design that would look a bit like the fern design in the light green area with long lines filling the space from the center to the outside. I decided on Chain of Pearls because it's just too pretty to pass up!
Machine Quilting Design #8
Our last quilting design for the Twin Rainbow Stars quilt is called Modern Weave and it's a combination of straight lines and triangle shapes that creates a dynamic effect on your quilt. I quilted this design into the pink spaces so the triangles almost look like diamonds stacked together:
We've now learned eight beautiful machine quilting designs and how to quilt them on a soft scale that would be perfect for a baby quilt. I hope you've enjoyed this fun project and quilting along with me!
The last step to creating this quilt is to trim and bind the edges. Click here to learn how to bind your quilts completely by machine.
Please share this Twin Rainbow Star project with your quilting friends and help other quilters learn how to quilt their own quilts!


