Goodbye Loft!
Before we could begin wiring the shed, the loft on the left side had to be removed. We tried hammering and tried knocking it loose with a large board, but it was nailed in super tight.
So we plugged in our electric chain saw and cut it out in a minute flat. We ended up salvaging the 2 x 4 boards from this piece so nothing was wasted.
After getting the loft out of the way, we had to frame out the interior walls with 2 x 4s to have something to nail the bead board paneling to later. We added boards to each of the corners, plus along the angles of the roof to give extra support to the paneling.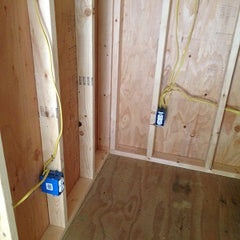 Wiring the Outdoor Shed
Almost before I'd finished insulating the floor, our electrician began wiring the inside with two 20 amp circuits. The circuits will power all the lights and sockets for the craft room as well as a heater in the winter and small air conditioner in the summer.
After a lot of consideration, I decided to set up two large florescent lights fitted with daylight bulbs to the ceiling. Over the lofted side, we'll install one more florescent fixture to illuminate the area over my cutting / pressing table.
The electrical was finally done in three days, wired all into a 70 amp/4 circuit breaker box behind the door. The barn is grounded with a #6 ground and long ground rod driven deep in the ground. When we're ready for power, we will dig a trench from our house to this side of the barn and bury a conduit wire that will power the barn from a new breaker box from insider our house.
Special Considerations for Filming Videos
Originally I'd planned to add lights to the facing wall which would shine directly in my face for filming. After watching several lighting YouTube videos, I decided instead to mount two plug in lights in both corners that I can control the amount of light and dim using filter screens.
In order to easily access these lights, I decided to wire the two back electrical sockets to be controlled by a switch next to the door. This way when I come in the craft room to film, all I have to do is flick both switches and all the lights in the room will turn on immediately. This is SUCH an improvement from the 7-9 switches it takes to illuminate my current filming studio! Insulating the Shed Walls
After the electrical work was complete, the next step was the insulation. The Roxul insulation was so much easier to manage and put in place than the traditional stuff, and I did not find it abrasive or itchy at all. Wish I could say the same about some aspects of this whole experience!
Unfortunately it was very challenging to find the 24 on center insulation for the ceiling and the soonest it would get in stock was several weeks wait. I ended up buying more 16 on center insulation and we cut and fitted it into the ceiling running horizontally. We ended up using far more insulation than I expected, and another unexpected limitation was it had to be purchased in sets of 3 large packs.
I share this here because it's good to research what types of insulation are available immediately at your local hardware store. Even though 24 on center is a standard stud distance, my local Lowes hardware didn't keep any 24 on center insulation in stock. This kind of thing can really slow down a project so it's good to keep it in mind and place your order at the beginning so you have the right materials when you need them.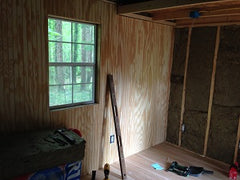 Covering the Shed Walls with Bead Board Paneling
When the insulation was in, we then cut pieces of 3/8" bead board paneling to fit the walls, including cut-outs for the sockets and switches and installed using a nail gun.
The hardest and most time consuming part of this process was finishing the loft, and very understandably it was impossible to install the paneling absolutely perfectly. We plan to fill these gaps with caulk and trim, then prime and paint the walls next.
Where was I during this whole segment? Most of the wiring, insulation, and paneling took place while I was at spring quilt market. While I hated to miss out on the wiring fun (it really is cool), I'm looking forward to being more involved from here on out as the shed is truly transformed from an unfinished building to a powered, insulated, heated / cooled craft room! Here's a quick video we shot right after returning from my week long trip:
Click the articles below to learn more about how I converted a prebuilt shed into my craft room, the Crafty Cottage:
 Picking the Shed |
 Shed Delivery |
 Insulating the Shed Floor |
 Wiring & Paneling |
|
Electricity! |
 Paint, Lighting, and Carpet |
 Organizing the Craft Room |
 Budget |


