The first step to any quilt project is to prepare your fabric and cut it into pieces. Learn how to begin your Prism Path baby quilt on the right foot with this new quilting tutorial video:
Today we’re starting our third quilt this year, the Prism Path baby quilt. This baby quilt is very fast to piece and even faster to machine quilt. It's the perfect choice for a simple, but elegant quilt to make for your baby or give as a gift.
Find the quilt pattern for Prism Path in the book Explore Walking Foot Quilting with Leah Day.
Inside you'll find the quilt pattern for Prism Path which we will be using to make this baby quilt together step-by step. This book also includes a wealth of information about walking foot style quilting and seven beautiful skill-building quilt projects.
Do I HAVE to Wash My Fabric?
No, you don’t. Many quilter’s skip this step and rush straight to piecing because washing, starching, and pressing fabric can takes extra time.
But if you want to make a baby quilt that can actually be USED by a real baby which means being covered in spit-up, peed on, drug around the house, stomped on the floor, etc., then it will need to be washed.
If you want to wash your quilt with confidence and never have to worry about the dyes bleeding or fabrics going weird, then you must wash your fabric before cutting it into pieces for your quilt.
I wash the fabric for every quilt because I want to be 100% sure the fabric is color safe. My very first quilt bled blue dyes all over white fabrics. That first quilt took a few months to create and it was horrible to see the pretty white fabric discolored to an ugly gray.
It was a lesson I’ve never forgotten so before starting any quilt, I throw all the fabric in the washing machine and wash it with a dye grabber and a 10-inch square of plain white fabric. I also add a bit of mild detergent, but no extra chemicals like fabric softeners which can make the fabric harder to cut accurately.
The dye grabber is going to help catch any excess dye or color in the water. This is always going to show up discolored no matter how many times you wash the fabric.
The white square of fabric is my canary in the cave. If it comes out of the washer looking discolored, that’s a sign there’s enough dye floating around in the water to stain other colors. That tells me the fabrics need to be washed again.
For Prism Path, we are using batik fabrics that tend to bleed dyes more than solid or print fabrics. It might take two to three washes before the fabric is color safe. It’s worth taking the time to prewash your fabric to ensure the fabric colors remain vibrant and true for years to come.
Do you want to hear even more reasons to wash your fabric before cutting? Learn more in this podcast episode.
 What about precuts?
 What about precuts?
Precut fabrics can't be washed because they have already been cut into a smaller shape. This is a gamble. This is like playing Russian Roulette with your quilt because there's no guarantee those fabrics won't bleed all over the place!
Cross all your fingers and toes the fabrics don't bleed and maybe consider using a dark background fabric too. That way if it bleeds, it will only show in the rainbow area, not in the pretty background fabric.
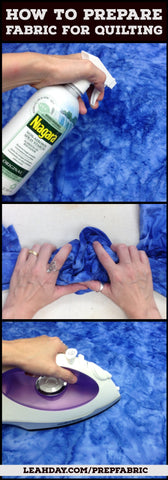
How to Starch and Press Fabric for a Quilt
Just like washing the fabric, many quilters skip starching their fabric because it usually feels slightly stiff straight off the bolt from the quilt shop.
Fabric manufacturers chemicals to make fabric feel good and look pretty at the store. Think about it - if fabric looked like a wrinkly mess loosely folded on a piece of cardboard, would you want to buy it? Probably not.
This is another case for washing your fabric when you bring it home - it’s better to remove those excess chemicals from manufacturing rather than leaving them in forever.
This is also something that can effect your quilt piecing and how easy it feels to match seams. Some fabrics come off the bolt feeling super soft while others feel very stiff and stable. If you try to piece these two fabrics together, no matter how accurately they were cut, you're in for a fight because one will likely stretch out of shape while the other remains the same size.
The only way to get all your fabrics feeling the same way is to wash it, then apply the same amount of starch to each fabric yourself.
Oh, wait, have you been told starch is bad for your fabric? That’s a quilting myth I could happily rant about all day. Click Here to find a podcast episode all about using starch.
Preparing the Fabrics for the Prism Path Baby Quilt
The good news is preparing the fabrics for Prism Path is very easy! You only need 1 fat quarter (18 x 21 inch rectangle) of each rainbow fabric, then a bit of yardage for your background.
Fat quarters are very easy to prepare because they’re smaller and easier to work with. Just follow the steps I took in the video to starch and press, then fold the fabric so it’s easy to cut into long straight strips.
For the 1 1/4 yards of background fabric, first cut this amount in half so it’s easier to work with. I never work with giant pieces of fabric unless it’s the backing of the quilt. To see how to square and cut a bigger piece of fabric, watch this quilting tutorial video from the Rainbow Log Cabin Quilt we made earlier this year:
The Key to Cutting Straight Strips
The key to cutting long straight strips and having them end up long and…um…straight starts with the fabric preparation. It is so much easier to fold and cut fabric that is stiff, stable, and isn’t stretching and wiggling out of shape.
The other key is the Square Dance. Hold the selvage (thickly stitched or printed ends of the fabric) in your fingertips and wiggle the ends back and forth. When the fold along the bottom looks smooth and flat, that means the threads in the fabric are lining up straight through the length.
Lay the fabric down carefully and press that fold with your hands. I don’t press this with an iron because as you cut, you may need to pick up the fabric and do the Square Dance again.

Now to cut your strips, align a thin line on your ruler with that fold. Cut off the frayed edge of the fabric, then flip it over. Why flip it? Because you should always cut with your dominant hand. Trim off the edge, then flip the fabric over so you can keep cutting with the same hand.
How to Check if Your Strips are Straight
Fabric offers us many opportunities to check if it’s properly cut. The easiest place to check your strips is on that fold in the middle. Open the strip and take a look at the fold. If the fabric was folded so the fibers run straight through the fold, then the edges will be straight perpendicular to that fold.
But if you see a little “V” or peak in this spot, it’s a sign either the fabric wasn’t folded straight, or the ruler slipped as you cut. Flip it back over, square off the end, and try again.
All This to Make a Baby Quilt!?
Yes, there are a lot of little steps to this process. I believe in teaching you how to make a quilt with a solid foundation. If you want all the seams within the rainbow area to line up, that starts with fabric preparation and cutting. Each step of the quilt making process builds on the last.
If you’d like to learn more about piecing and how patchwork quilts are a building process from start to finish, please check out my book How to Piece Perfect Quilts.
Prism Path Quilting Homework
Are you going to follow along each week for this quilt along? That’s great! Your homework this week is to prepare your fabrics for the Prism Path baby quilt and cut out all the pieces.
Take your time cutting out the strips and the background pieces using the cutting chart. Where can you find this magical cutting chart? Find it in my book on walking foot quilting.
Let's go quilt,
Leah Day
Find all of the posts for this baby quilt along by clicking the images below!


