Strip piecing is a helpful technique for piecing quilts quickly and easily on your home sewing machine. Some patchwork methods are faster than others, and strip piecing will not only save you time, it will also streamline the creation of your next quilt.
When Strip Piecing is Essential
I created the quilt, Flowers for Ellen, below for my mother-in-law in 2005. I understood the basics of strip piecing when I began this quilt, but stubbornly decided not to use this technique because I couldn't figure out how I would organize my strip sets without having lots of waste or having to change the design.
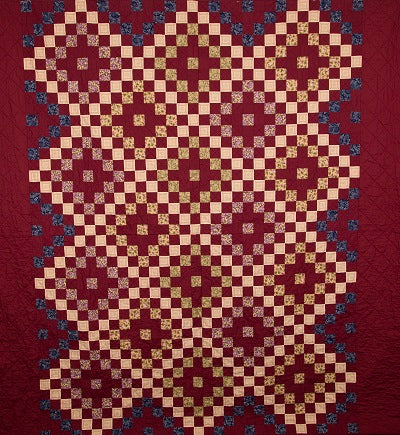
After cutting 1271 squares, I'd knew that I definitely wanted to strip piece a quilt like this the next time around! Cutting all the squares separately was very time consuming and tedious, and the process of piecing them all back together accurately was nearly impossible without space to lay out all the little squares.
This quilt would have been perfectly suited for strip piecing because it was constructed with square shapes all cut the same length. With a bit more planning and less stubbornness, I could have strip pieced Flowers for Ellen and saved lots of time and frustration.
How Strip Piecing Works
The idea behind strip piecing a quilt is simple: most quilts are created with a series of squares or rectangles in a certain color pattern that are all cut the same length.
 In the case of the quilt above, all the squares were cut 2 1/2 inches square.
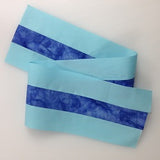
Instead of cutting out each individual square, in strip piecing, you cut a long 2 1/2 inch strip. These long strips are sewn together, to form a pieced strip set.
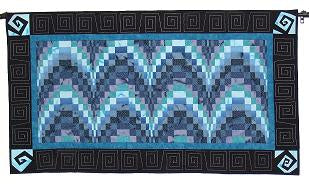
This strip set is then cut down into pieced units. These units can be cut the same length as the strips originally (2 1/2 inches) or cut different widths to create interesting effects like this bargello quilt:
This quilt began with 2 1/2 inch strips pieced together, then pieced strips ranging from 1 - 3 1/2 inches wide were cut and pieced to create the wave effect.
Strip Piecing Tips
- Don't pin strips unless you have to. Pinning often causes quilters to pull and distort the strips so they fit exactly to the pins.
- Before matching right sides, first fold the strips in half and mark the center with a crease. Match this crease so that the strips are evenly pieced together.
- If at any time you find yourself stitching a bigger or smaller seam allowance than 1/4", rip the seam out and stitch it again.
- Finger press seams open, then press seams again with a hot, dry iron. This will not only increase your accuracy, but all your seams will match much easier.
There is no difference in the look of this quilt than one that is strip pieced. No one will ever know the difference. The key with this technique is accurate cutting and piecing to ensure all the seams match up perfectly.
The hardest part about strip piecing is cutting the long strips of properly so they are cut square with the grainline of the fabric.
Learn much more about cutting and piecing strips accurately and how to use this technique to piece a simple nine patch quilt in the book How to Piece Perfect Quilts.

