Are you ready to put your fusible applique quilt together? Today we’re going to take all of the pieces we prepared and connect them together like a big 33 piece puzzle to create this fusible appliqué goddess quilt. Learn how in this new quilting tutorial:
Just in case you missed last week’s post, click here to learn fusible appliqué basics
How Fusible Appliqué Works
Fusible appliqué uses a very simple concept – stick glue to one side of your fabric and it will all stick together.
The tricky part of fusible appliqué is figuring out how to build a complex shape like the Eternal Love Goddess without using a light box (most quilters don’t have them), without marking on the fabric (it will heat set as you press the fusible web) and without making the quilt super stiff with multiple layers of fabric and glue.
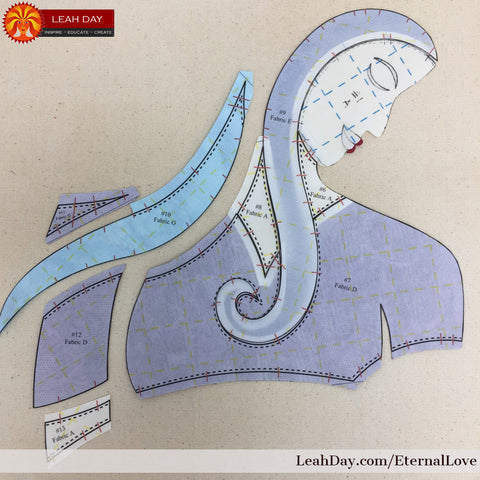
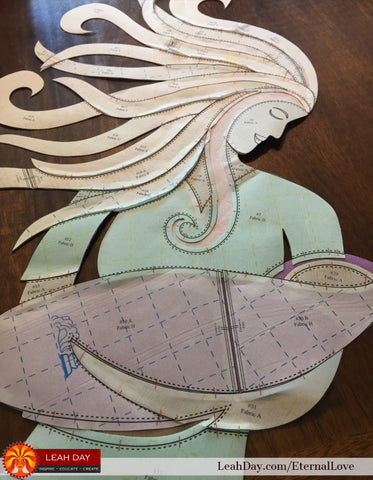
I found through a lot of trial and error that they key to any appliqué technique is good break lines and information printed on the pieces. Using the pattern numbers and breaks marked on the paper side of the fusible web, you can arrange the pieces accurately without a light box and without needing to mark anything on your fabric.
Building the Goddess One Section at a Time
As you can see in the video, I organized the pattern into distinct sections: face, body, hair, baby.
It’s up to you if you want to fuse the face first or wait until the very end. Our full time piecing employee and I a discussed this once and they preferred to wait until the end and I liked the lips and eye pieces attached from the beginning. There’s really no right or wrong way to do it so just go with your gut.
You probably also noticed in this video, I wasn’t fuse tacking for nearly long enough. This really became apparent when I began peeling off all the paper to flip the goddess over onto the background. She started falling apart!
Honestly it was a combination of not fuse tacking long enough and being too rough with the appliqué. There’s no reason to constantly flip from one side to the other. I was mostly wanting you to see how things were coming together, but it really wasn’t necessary and was definitely putting more stress on the pieces than they could handle.
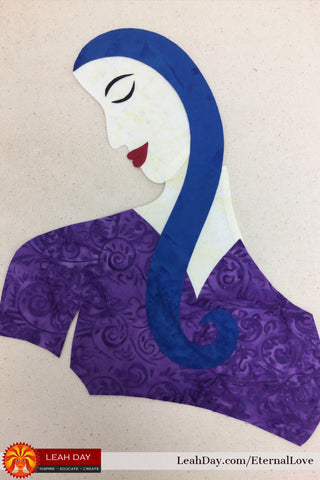
So once you get the face fused, flip the entire piece over and leave it face down (paper side up) for the entire rest of the time. Then at the end when you flip her over to place on the background it will be a big reveal!
Fusing the Appliqué to the Background
The last step is to press the piece to the background. Make sure the entire piece is flat, well connected together, and positioned in the middle of the background rectangle. I used a pressing cloth for half the fuse, then removed the pressing cloth to make sure every single piece was solidly fused to the background.
Steam or No Steam? – I know the fusible web I’m using is called Steam a Seam and steam is part of the instructions. But I’ll be honest – I rarely ever (never) put water in my irons so I don’t usually use steam with this fusible web. I use a hot, dry iron on the cotton setting and press for several seconds and that has worked well for me. Please experiment with this to find what works best for you!
After you think you’ve pressed enough, pick up the piece and pull on the edges of the appliqué shapes a bit. If they start to lift off, press for a few more seconds.
Quilting Homework
This week your task is to put together the 33 piece puzzle of Eternal Love! Take your time and enjoy this connecting and fusing process as you build your goddess quilt top.
Jump to the Next Post in the Eternal Love Quilt Along
Click Here to learn how to finish the raw edges of your appliques

Would you like to join in the fun and make the Eternal Love Goddess Quilt with me? All you need is the quilt pattern to get started. Find links to all of the things mentioned in this tutorial right here:
Let's go quilt,
Leah Day
#1 - Fusible Applique Basics - Prepare and Cut Shapes
#2 - Build a Quilt with Fusible Applique
#3 - Finish Raw Edges with Blanket Stitching
#4 - How to Free Motion Quilt Hair and Body Parts


4 comments
I’m so happy you found this tutorial helpful June! On the batting, it’s really down to whether you do the edge stitching as a quilt top or as a basted quilt. I’d advise the thinnest batting you can find if you decide to do the zigzag on a basted quilt. You can use any thickness of batting when you stitch on just the quilt top because all the appliques will be 100% secured. More on this very soon!
Thank Goodness for your video. I too would have been unable to get this together without it. Looking ahead. I hope you discuss the differences between different battings. Is Warm and Natural batting too thin for this quilt or maybe two layers of it.
That’s wonderful Barbara! I’m so happy you found this video helpful and you’re making the Eternal Love quilt with me!
I can’t thank you enough for making the tutorial, I don’t think I could do this pattern otherwise. It was a challenge but I have my goddess pressed to the background and I’m just waiting for the next step. I am so proud of myself! Thanks so much, I love it!