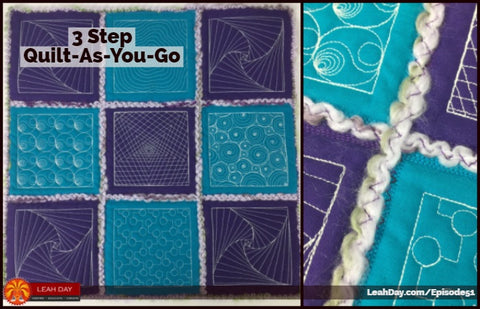
Hello My Quilting Friends! Today in Episode 51 of the podcast, I'm chatting with Jenedel Wilcox, a hobby quilter who uses a really cool Three Step Quilt-As-You-Go technique to make pretty quilts. Meet Jenedel and see our very first 100% video podcast right here:
If you'd rather listen to the podcast instead, here's a player you can use to listen or download the episode instead:
Jenedel is a hobby quilter and she spends part of the year in Florida where she only has one small sewing machine. In order to make the best of her quilting space, she likes to quilt blocks, then connect them together after they've been quilted.
 This technique of connecting quilted blocks is called Quilt-As-You-Go and as I mentioned in the podcast, we often abbreviate that as QAYG. I love quilt as you go because it makes quilts so much more manageable on a small home machine and it allows you to quilt intricate designs over blocks that might be really challenging to quilt otherwise.
Jenedel emailed me a few months ago after I mentioned in another podcast that I was playing around with new quilt as you go methods. I've used my Quilt-As-You-Go binding method for years and taught it in multiple quilt alongs, but I'm always interested in learning new techniques.
She described the method and sent me pictures, but I couldn't really get a feel for it. So I stitched out a batch of blocks from the Marvelous Modern embroidery collection and sent them to Jenedel and she connected them together and made me this cute little quilt!
And here's the back of the quilt, which I think looks just as good as the front! All of these squares were quilted / embroidered from the Marvelous Modern Embroidery design collection.
She also sent me this awesome mug rug which I now use at my computer every day. What's funny is I didn't SEE the diamond shapes and how this technique could be used to connect strange shapes like diamonds, hexagons, and triangles until Jenedel mentioned it in our interview. LOL!

Jenedel also typed up some instructions to guide you through this technique too. Click Here to find the Three Step Quilt-As-You-Go PDF.
Now I know the #1 question you have is how will this wear on a bed quilt? Can it be washed? What will happen to the yarn?
Just last week I sent Jenedel an email to get a photo from her and asked her to send me a picture of a throw / bed quilt she'd made and washed with this technique. Here it is:

Here's the details about this quilt from Jenedel:
-10 inch cotton squares in solids, not pre-washed
-many yards of floral fabric, pre-washed because it was a "find" at a resale shop (cut into 10 inch squares)
-Quilters' Dream Request batting, which is a light weight poly batting with lots of body (I cut up a big batting into 10 inch squares)
-acrylic yarn for couching front and back seams (also from resale shop)
-Aurifil variegated thread, 50 weight (the thread cost more than the floral fabric!)
-washable glue stick to hold yarn in place for couching (because it was so big, I found the glue made it much easier to keep yarn centered on the seams)
The quilt is 7 blocks by 8 blocks, all half square triangles made from 10 inch squares, with the triangles sewn together in a quilt as you go method onto the quilt batting and backing 10 inch square. I pressed this seam flat then quilted seam with serpentine stitch. This stitch was used to quilt each block in one inch increments from both sides of center seam.
I should note that the blocks were all arranged and labeled ***before ***any sewing was done. All the ten inch squares were cut in half diagonally.
After all the quilting was done, I trimmed the blocks to 9 inches and joined using the three step process, with couching yarn on the back and front seams during the joining process. I made a standard binding from the floral, sewed it to the back, flipped to front and stitched down by machine. I am very happy with the results of the quilt and my test washing.
This sounds really good to me! I think it's worth a try and certainly a great idea to experiment with using the 3 Step Quilt As You Go method on a small project, then throw it in the wash to see what happens.
A set of placemats for your table would be a good test because they will get washed several times a month and give you a good idea of what this technique and the yarn will look like after some wear and tear.
One thing to keep in mind with any Quilt-As-You-Go technique - this will not save you time.
This will save you effort shoving a big quilt through the arm of your sewing machine, but it will take just as much time to quilt your project, plus a bit of extra time to connect the quilted blocks together.
So please keep that in mind when you are considering any quilt as you go technique.
Just in case you missed it, Click Here to download Jenedel's guide to Three Step Quilt As You Go.
I loved learning this new technique from Jenedel this month. Do you have an awesome quilting technique you'd like to share? Let's collaborate and share it with the world! Click Here to contact us and let's make something pretty together.
News from my basement...
It was raining this week so I plopped down on the couch in the basement to record the podcast introduction. This is where we watch TV and play video games and I (usually) work on my cross stitch project. Lately I've been dogging out on this little goddess project because I've been playing Zelda Breath of the Wild instead of watching Star Trek.
This game is super addictive and a lot of fun and honestly I've been working my butt off during the day writing, filming videos, editing, and more so I think I've just been needing a break in the evening anyway. Just in case you missed it, I've been blogging daily (yes, every single day) since April 1st. I'm trying to make this a daily habit so please check out the Free Motion Quilting Project to see what's happening.
One of the big things I've been working on is our new Prism Path quilt along! Click Here to find the first post.
This week is all about fabric preparation and cutting to get you ready for the good stuff next week. We're going to piece and quilt this baby quilt in just 6 weeks so it's going to be the perfect project to work on together this spring.
I also let slip that I'm working on becoming a sewing machine dealer. Yes, we will have sewing machines coming soon to the Quilt Shop along with lots of tutorials on how to use them. I may even make a new class or two just to cover all the basics. I know most kids are no longer being taught any sewing skills so I think starting with the absolute basics is a good place to begin.
And speaking of kids, I finished Mally the Maker! This is the fiction novel I've been working on since October. I'm SO excited about this book and I love how it turned out. There's still a lot to do on this project between editing and cover art and all that good stuff. I'll definitely keep you updated on how it goes.
This is another pretty project I shared this week on Quilting in Reverse, or upside down? Basically I made a double-sided quilt and quilted by following the Twisted Squares design I printed on 2 yards of Minky Fabric.
I LOVE how this turned out. It's honestly become my most favorite quilt ever in just the few days since I finished it. It's soft, cuddly, and so bright and cheerful. I can't help but smile when I wrap myself up in this quilt.
Click Here to find the Twisted Squares / Rainbow Road / Reverse Quilting Tutorial
This quilt also represents something very important to me. It's a reminder to put my projects on my to-do list. If I don't prioritize the things I want to make, that are meaningful and fun for me, then when will they ever get done?
I'm definitely planning to play with this idea more with new fabric designs and colors. If you like Twisted Squares, but you don't like the rainbow color, please contact us to suggest a new colorway for this fabric.
So that's it for this week! Please join in the fun of the Prism Path Quilt Along. Click Here to find the first post to get you started preparing your fabric and cutting the pieces.
Let's go quilt,
Leah Day

