Zippered pouches are one of the most popular projects to sew these days. They're easy, quick, and with the right steps, you can make very professional looking results. I've been wondering if I could make a QUILTED zippered pouch to use up quilting practice sandwiches and give the bag more body. Turns out, it's a great way to merge the two wonderful crafts of sewing and quilting! Learn how to make a quilted zippered pouch in this tutorial:
Quick links to things mentioned in this quilting / sewing tutorial:


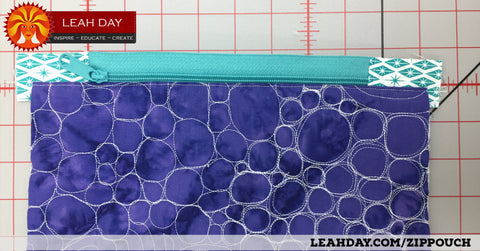
How do you make that cool design? That is a combination of free motion quilting and ruler foot quilting! Click Here to learn how to quilt Crazy Ziggie.
Click Here to learn how to quilt Pebbling.
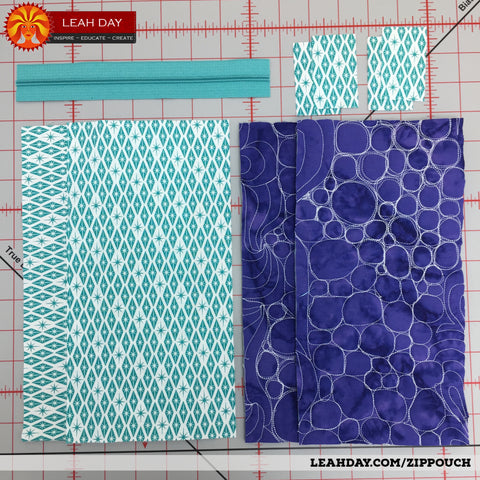
Step 1 - Cut Your Zippered Pouch Pieces
This sewing tutorial is really versatile because you can make the bag any size you like. I went with 5 1/2 x 10 1/2 inch rectangles for both the quilted outside panels and the plain 100% cotton lining.
I also cut my zipper 8 1/2 inches and some 100% cotton zipper side pieces 1 1/2 x 2 1/2 inches as well.
Step 2 - Prep the Zipper
The key to a beautiful zippered pouch is the zipper! Stitch the side pieces to both sides of the zipper, then top stitch to finish the ends. There are a lot of different variations for the ends of the zipper and I've only just started playing with these. You can add tabs, pulls, loops, hooks, etc to the ends if you like. I decided to keep things simple with this tutorial and just add plain fabric ends to both sides.
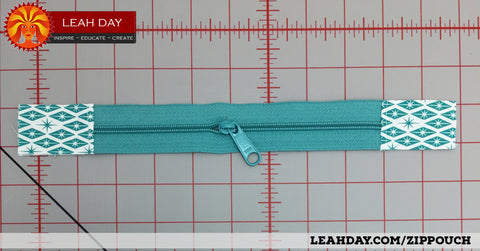
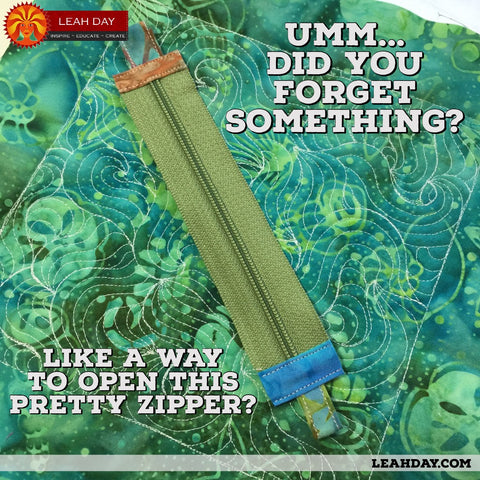
Make sure to add your zipper pull! I made another bag this weekend and forgot that part and had to rip it out in order to add the pull.
I like using a wide, contrasting zipper, but you can use pretty much any style or type you like. Do experiment a bit with how close you stitch to the zipper teeth.
Step 3 - Stitch on One Side of the Pouch
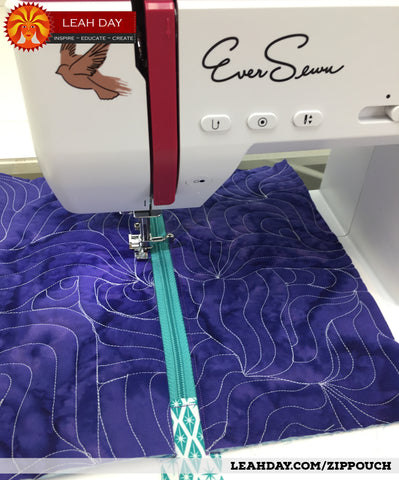
Stack up your pieces with a lining rectangle right side up, zipper right side up, quilted rectangle right side down. Put a zipper foot on your machine and stitch through all three layers.
For the Eversewn Sparrow 20 sewing machine, you don't move the needle when working with a zipper foot. Just click it into the right or left side so you're closer to the side you're stitching along.
Personally I found I liked it better when more of the zipper tape was showing and it was also easier to stitch because I didn't have to get right on top of it with the zipper foot. I like this better because you end up seeing more of the side zipper fabric pieces on the ends, but this is something you should play with to get the look you like.
Step 4 - Topstitch
Fold the lining and quilted front out and finger press the seam nice and flat. Then if you want extra points (and to greatly reduce the chances of your lining catching in the zipper) topstitch along that edge around 1/8 inch away.
Step 5 - Wash and Repeat
No, wait, don't wash it! Just repeat the same steps on the opposite side!
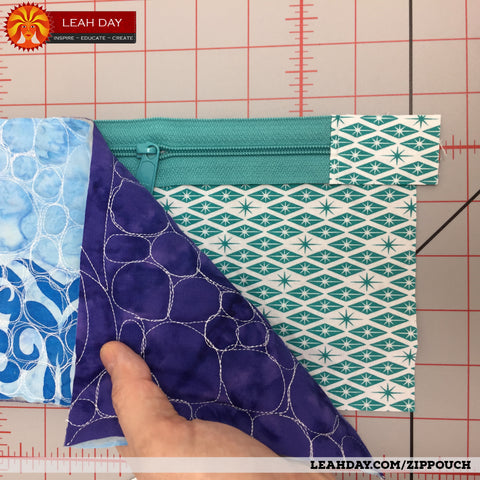
Step 6 - Arrange and Stitch the Bag Together
Spread out the bag on your table so the lining pieces are right sides together and the quilted fronts are right sides together. Pin if you need to and make sure to OPEN YOUR ZIPPER! I didn't have my zipper open and it was lucky I was able to nudge it open after stitching.
Debate - Seam allowance to the front or seam allowance to the lining.
Allow me to digress into a quilting / sewing debate on pressing the zipper seam allowances! In the video I pressed the seam allowances for the zipper and the teeth towards the lining. I've since played with this even more (zippered pouches are very addictive) and found it might work better to press the seam allowances towards the front quilted pieces.
Eh...this is still a work in progress! I'm also playing with new ways to finish the ends of the zippers that it's not even included in this line of stitching, but that's another tutorial for another day...
Stitch Around the Bag
Start about 2 inches from the corner of the lining, backstitch, then stitch around the lining, up the side of the bag (over those seam allowances you pressed one way or the other), then around the fronts, back down the other side, and around the corner of the lining. Make sure to stop on the lining side and leave at least 3 inches open to turn the back right side out.
Backstitch again because this hole will get a lot of stress as you turn the bag the right way out.
Now clip the corners close and turn the bag through the hole you left in the lining. I hope your zipper was left open!
Use a point turner, blunted scissors, or some other dull pointy object to poke out the corners of the bag and lining.
Step 7 - Finish the Lining and Show off Your Pouch!
The last step is to sew up the hole in the lining. I like to just fold this together and topstitch on my machine. It's the lining - it doesn't have to be perfect!
But if you want this to be 100% invisible you can also stitch it by hand.
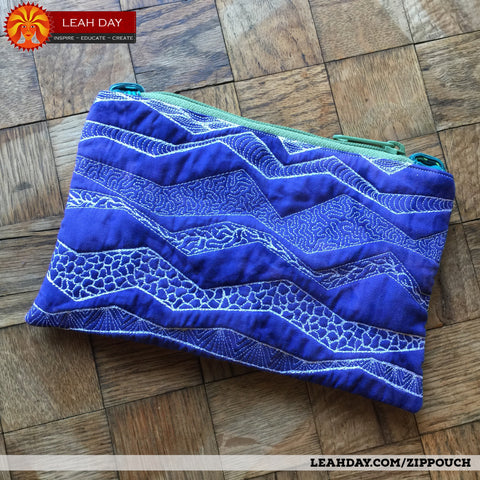
Now stuff the lining into the bag and pull the zipper closed. It's done! Quilted zippered pouch goodness and I'll bet you can't make just one!

But wait... what about all that pretty quilting?
Making quilted zippered pouches is great way to practice free motion quilting and to experiment with combining different designs. Click Here to check out the quilting design gallery for inspiration!


19 comments
This is one of the best tutorials I’ve seen! Your instructions are so easy to follow and I absolutely love this method for making a pouch. Thank you!
Leah I am a huge fan of your quilting and of you. I have been watching your videos for a long time and they are always very clear instructions. Thank you. This is perfect.
Hi Brenda – LOL! You have an addiction to zippered pouches! I love it! I’m so glad you enjoyed this method. It’s very fast and easy and that’s the whole point!
Hi Cindy – yep, this video is also available on Youtube. I’m so glad you enjoyed this tutorial!
Thanks for this pouch tutorial. I have been making them for a while (think I need a 12-step program!!), and enjoyed your different approach to the end tabs for the zipper. Your technique seems simpler than the one I have been using, and will have to try it on my next project.
Leah, your clever method of piecing this zippered pouch together both greatly improves it and results in a more professional finish. Thanks so much for this tutorial. Will this be available on YouTube?
Thank you Sloane! I really appreciate your kind comments!
Leah,
Thank you for your tutorial. I have been wondering what to do with my embroidery samplers. This is pretty, clever,and so clever. What a wonderful little gift to have on hand. You are such a treasure.
Hi Susan – Thank you so much! I’m so glad you enjoyed this zippered pouch tutorial!
Leah I am a huge fan of your quilting and of you. I have been watching your videos for a long time and they are always a breath of fresh air for me. Thank you. This is perfect.
Your tutorial was wonderful; just the answer . Is there a way to print this off without taking several pages? My memory would have me back at the computer over and over again. Which I will do if that is what it takes. I have the quilting idea in mind. A small center motif with straight lines radiating out around it. It’s so pretty in my mind. LOL
Thanks Leah – very well explained – I have made one before and couldn’t work out how to get the nice finish around the end of the zip. Now I know X
Hi Roberta – Nope, I didn’t make a printable pattern for this tutorial. You can find the cutting information written on the page.
did you post the printing instructions for this video
Thank you!! I appreciate this. Very much!I am teaching myself to sew and quilt. This is my next project :)
Fun tutorial Thanks, going to use it for a lesson as I’m teaching my grandchildren to sew. you give us such great resources. Thanks again
I love this tutorial! What a great way to use up those practice pieces. I laughed out loud when I saw the zipper tape with out the zipper pull! I have caught myself just about to cut the zipper to length before I realized that I needed to move the zipper pull! Thanks for sharing this — I think I need to make one of these today !
Absolutely brilliant I loved the way you explain each step and the finished result was beautiful
I enjoyed your vedio. I want to make one only bigger.