What in the world is a top fitted sheet? This is a top sheet that has elastic attached to the bottom two corners so it fits snugly to the bottom edge of the mattress and does not pull out or come untucked easily.
If you've struggled with your top sheet constantly coming untucked, you know how annoying this problem can be! The wonderful thing is it's very easy make your own top fitted sheets with basic sewing skills and a sewing machine.
Materials List
|
Top Flat Sheet Sharp Scissors or rotary cutter and mat Measuring tape or 18" acrylic ruler |
1 1/2 yard - 1/4" Elastic Sewing machine Thread to match sheet |
Top Fitted Sheet Video Tutorial:
Top Fitted Sheet Step-by-Step Instructions
Follow the instructions to sew a deep pocket and encase elastic along the bottom edge of your sheet to create a top fitted sheet.
1. Starch and press your sheet with a hot, dry iron.
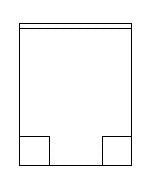 2. Cut off the hem on the sides and bottom of your sheet using sharp scissors or a rotary cutter and ruler.
3. Mark a 16" square on the bottom corners of the sheet according to the diagram to the right.
4. Cut out the squares cleanly with sharp scissors or a rotary cutter. Save this fabric for another terrific project!
5. Working in one corner of the sheet, bring the two cut edges of the corner right sides together. Pin and stitch this seam with a 1/4 inch seam allowance, then finish the edge with a zigzag stitch. Repeat with the remaining corner.
6. Now you have a nice deep pocket for both corners of your sheet, but without elastic, this sheet won't stay on your bed! We need to set in elastic along the bottom edge of this sheet.
We also need to replace the hem all around the sheet too. So why not sew the hem AND encase the elastic all in one step?
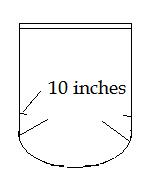 How to Sew a Hem and Encase Elastic in One Step
7. Fold over and press the sides and bottom of the sheet 1/4 inch. Fold over and press again 1/2 inch for a fully encased hem (no fraying raw edges). Press and starch to firmly crease if needed.
8. Before you sew, use your ruler to measure 10" from the corner seam up the side of the sheet and mark this spot using a fabric marking pencil. Check out the diagram to the right for illustration. This mark indicates where the elastic should start and stop within the bottom edge of the sheet.
9. Now cut your elastic according to the chart below:
|
Twin Sized Sheet |
Full / Queen Sized Sheet |
King Sized Sheet |
|
30 inches |
40 inches |
47 inches |
10. Start stitching the hem at the upper corner of the sheet. It's easiest to use an edge stitching foot so you can stitch exactly 1/8 inch away from the hem fold.
11. When you get to the first mark for your elastic, insert your elastic inside the hem (which now becomes a casing). Pivot the sheet and stitch through the elastic a few times to secure it at this point.
12. Continue stitching down the hem, encasing the elastic as you go. BE VERY CAREFUL NOT TO STITCH THROUGH THE ELASTIC. If you stitch through the elastic, you will not be able to pull it through the entire sheet edge, so rip it out and try again.
13. You will get about halfway through the bottom edge of the sheet and you will run out of elastic. Now use one hand to gently pull the elastic tail out of the sheet and the other hand to hold the sheet. The sheet will begin to gather. Just keep the bunched section behind the machine and continue pulling the elastic.
14. When you get enough slack, pin the elastic end to the final mark and continue encasing it. You may need to pull more, you may not, but just go slow and don't sew through the elastic.
15. When you get to the final mark, pivot and sew through the elastic 2 times to secure it. Then pivot back to the hem and finish stitching it up to the top.
16. Clip all your threads and even out the elastic casing by gently pulling and manipulating the sheet around it.
Finally, go put it on your bed and enjoy never having your top sheet come untucked again!
Happy Baby Fitted Crib Sheet Pattern - Learn how to make your own fitted baby crib sheets step by step with Leah Day. Using your favorite fabrics, you can make crib sheets that will look great and wear better than anything you find in stores.
Back to Articles about Making Fun Sewing and Quilting Projects

