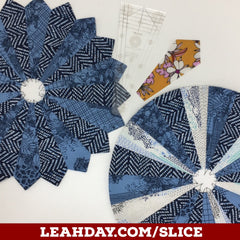
Are you ready to piece dozens of Dresden Plate Quilt Blocks? You've come to the right place to learn how to use the Dresden Plate Template Set to make any Dresden Plate you can dream of!

To help you get the most out of your Dresden Plate Template Set, I've created a series of quilting videos to guide you through using them step-by-step. Scroll down to learn more about using this set to make many beautiful quilts.
UPDATE! The Dresden Plate Template Set got a huge update in 2021 with extra etched lines and the new ability to cut out Dresden Rings as well. The new template set does look a little different from the templates in the video below (clear instead of green), but they work the exact same way. Click Here to find the updated Dresden Plate Template Set.
How to Create Dresden Plate Quilt Blocks
Let's begin by learning how to cut out shapes using the templates and piece a simple Dresden Plate block. Learn how to use the templates for cutting in this quilting tutorial:
I used a few extra materials to create the Dresden Plate petals in this video. I attach True Grips to the line side of my templates to stop them from shifting as I cut.
Follow the chart to cut out the required number of Dresden Plate Petals from the right width of fabric:
| Template # | Width of Fabric Strip | # of Petals Needed |
| #1 | 5-inch strip | 8 |
| #2 | 5 1/4-inch strip | 8 |
| #3 | 5-inch strip | 12 |
| #4 | 5 1/4-inch strip | 12 |
| #5 | 5-inch strip | 16 |
| #6 | 5 1/4-inch strip | 16 |
Always remember to piece the Dresden Plate in quarters, then trip up the inside edges before piecing them together! This ensures a perfectly flat, round shape every time.
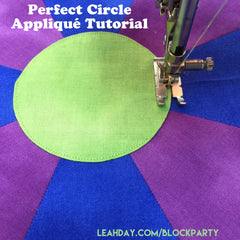
Click Here to find a tutorial on turning a perfect circle to applique in the center of your Dresden Plate.
How to Finish the Edges of the Straight Dresden Plate Petals
The edges of the Dresden Plate Petals can be finished multiple ways to change the size and appearance of the petals.
The wedge shaped templates #1, #3, and #5 can be finished with a pointy edge, folded straight edge, fused straight edge, and left completely unfinished and turned after piecing to form a wheel shape.
1. Pointy Petals - Watch the video above to learn how to fold and stitch the straight end of the petal to form a Pointy Dresden plate. Glue the Dresden Plate to background fabric and hand or machine applique it in place.
2. Folded Straight Edge - Press the top edge of the wedge shape over 1/4-inch. Glue this folded fabric down with Elmer's Glue so it stays in place (hint: use this microtip bottle to control the amount of glue you use).

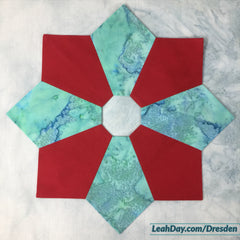
Piece the petals together starting on the folded outside edge to create a Dresden Plate with all straight sides. For template #1, this will make an octagon. Template #3 will form a dodecagon and template #5 will make a hexadecagon.

Glue the resulting polygon to your background fabric and hand or machine applique it in place.
3. Fused Straight Edge - Apply 1-inch strip of fusible web to the top and bottom edges of the 5-inch strip of fabric before you cut your wedge shapes. Cut out the shapes so you have 1-inch of fusible on both sides of the shape.
Piece the shapes together, then remove the paper backing from the fusible web and place the Dresden Plate on the background fabric. Fuse it in place, then finish the edges with a blanket stitch or satin stitch.
4. Fused Circle - Follow the same instructions for #3 to apply the fusible web to the edge of the wedge shapes. Piece the shapes together, then cut the outer edge of the Dresden plate into an 11 inch circle. You can also cut the inner circle too to create a Dresden Plate Wheel.

Click Here to find a tutorial on making quilt blocks using this technique.
5. Turned Edge Circle - For this Dresden Plate, simply cut out the number of petal shapes you need and piece them together. Create a 10 inch circle freezer paper turning template and press it to the wrong side of the fabric.
Using starch and a hot, dry iron, turn the fabric over the edge of the freezer paper to form a crisp, folded edge. Find a tutorial on how this works here!
Glue the Dresden Plate Circle on your background fabric and either hand or machine applique it in place.
Wow! That was a lot of ways to finish the edges for Dresden Plate templates 1, 3, and 5. Now let's work on the curved edge petal shapes.
How to Finish the Edges of the Curved Dresden Plate Petals
The petal shapes #2, #4, and #6 can be finished with a turned edge and fused edge.
1. Turned Curve - Watch how to do this in this quilting tutorial:
To make the turned edge petals, first trace the Turning Template included with the Dresden Plate Template Set onto freezer paper. Double the thickness of the freezer paper to make it extra stiff. Using starch and a hot, dry iron, pull the curved edge of the fabric over the end of the turning template.
Piece the shapes together into quarters, then square up the inside edges. Piece the Dresden Plate together and glue to your background fabric.
Hand or machine applique the curved petal Dresden Plate in place.
2. Fused Curve - To cut out curved petals with a fused edge, first prepare the fabric by fusing a 1-inch wide strip of fusible web to the top and bottom edges of a 5 1/2-inch wide strip of fabric.

Cut out as many petals as you need according to the chart at the top of the page and piece the Dresden Plate together in quarters. Square up the inside edges of the quarters, then piece them together to finish the plate.
Peel off the paper backing to the fusible web and position the Dresden Plate over your background fabric.
Machine applique to finish the raw edges of your Dresden Plate.
Piece Dozens of Dresden Plate Quilt Blocks
You can use just one template to create a Dresden Plate, or you can mix and match to create dozens of designs! Templates 1, 2, 5, and 6 can also be combined together to create different effects.
Check out the different effects you can create by mixing up the templates and changing the way the outer edge of the Dresden Plate petals are finished:
|
Template #3 - Folded Finish |
Template #1 - Folded Finish |
Template #3 - Fold & Point Finish |
|
Template #1 - Pointy Finish |
Template #5 - Folded Finish |
Template #2 - Turned Curve |
|
Template #3 - Pointy Finish |
Template #1 - Pointy Finish |
Template #5 - Pointy Finish |


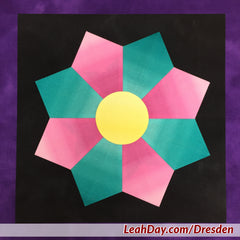
But that's not all! You can also finish the INSIDE of the circle to create even more effects! I call these quilt blocks Dresden Rings because the edges are finished to the inside and outside of the ring.
|
Template #6 - Folded Finish |
Template #1 - Pointy Finish |
Template #1 - Pointy Finish |


Turned Edge Circle Applique
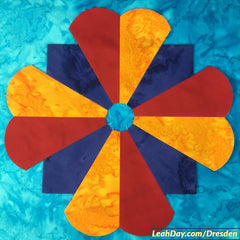
Check out the Circle Template Set to create a center circle for your Dresden Plates.

The center circle is what sets a Dresden Plate apart from a Dresden Ring - a new style of Dresden quilt block!
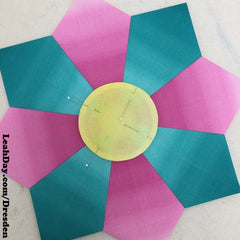
To make a turned edge circle applique, trace the circle design you like onto doubled freezer paper and cut out a turning template with scissors. For this style, make sure to cut your fabric 1 inch larger than the circle you're creating, then use the freezer paper template to turn the edges smoothly.
Center the circle over the Dresden Plate petals and pin or glue into place. To secure the shape permanently in place, take the Dresden Plate to your sewing machine and stitch around the circle 1/8 inch from the turned edge.
You could also hand stitch the circle in place with small hand applique stitches. Take a tiny stitch into the curved edge, then a small stitch into the Dresden Plate petals, then a small stitch back in to the curved edge until the entire shape is secure.
 How to Fuse the Circle Shape
 How to Fuse the Circle Shape
Press a square of paper backed fusible web to the wrong side of your fabric. Cut out the circle shape using one of the circle templates.
Peel off the paper backing and center the circle over the Dresden Plate petals. After attaching the Dresden Plate to your backing fabric, press the circle to fuse it in place to the petals and background fabric.
To cover the raw edges of a fuse circle you could satin stitch over the edge. Place a piece of medium weight tear-away stabilizer behind the block so the satin stitching doesn't distort your quilt block.
Appliqueing Your Dresden Plate in Place
Once your plate is complete, there are lots of ways to secure it to your background fabric. The simplest method is to center the plate over your fabric and pin it in place, then straight stitch 1/8-inch around the edge of the Dresden Plate petals.
If you have fused the curved edge petals, you can also finish the raw edges with satin stitching. Just be sure to use a medium weight tear-away stabilizer on the back side of the block so the dense satin stitching doesn't distort the quilt block.
You can also hand applique the Dresden Plate in place. Take a small stitch into the turned edge of the Dresden Plate petal, then take a small stitch into the background fabric. The smaller your stitches, the more seamless the appearance will be.
Make Hundreds of Dresden Plates and New Dresden Rings!
The updated Dresden Template Set includes etched lines on the templates that allow you to cut petals from narrower strips of fabric. This also gives you the opportunity to finish the inside edge of the Dresden too - creating a Dresden Ring.
Click the images below to learn how to piece these Dresden Ring Quilt Blocks!


