Welcome back to the Leaf Peepers Quilt Along! Last week we pieced our last block, so this week it's time to tackle the quilting! I’ve decided to quilt my table runner with a combination of ruler foot quilting and free motion quilting. Learn how to begin the quilting process with Echo Ditching in this quilting tutorial:
Quick links to everything mentioned in this quilting tutorial:
Sheri is quilting her Leaf Peepers Quilt very differently using only walking foot quilting. Click Here to check out her tutorial!
Machine Quilting Basics
The first thing to understand about Ruler Foot Quilting is it’s a type of free motion quilting. You can still move your quilt in all directions and quilt free motion filler designs, but with a ruler foot attached, you can also use the edge of rulers or templates to guide your quilting design.
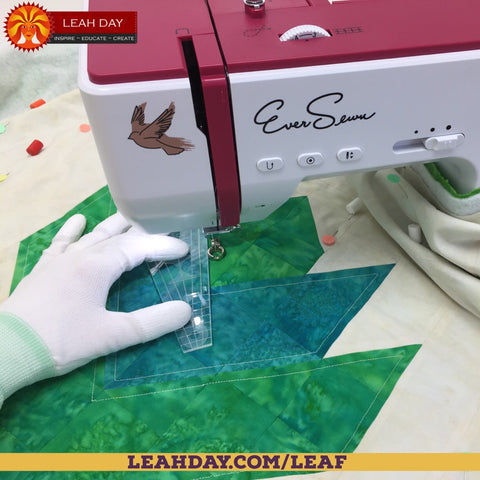
But let’s talk about the machine settings you’ll need to use to get started. I set the stitch length to 0.0 mm and place a Free Notion Glider over the machine bed. This slippery Teflon sheet helps the quilt slide and glide easily under the needle.
No, I don't drop my feed dogs. I find my machine has better stitch quality and tension when I leave the the dogs up, and just change the stitch length to 0. Read more about dropping the feed dogs here.
I'm quilting with Isacord thread in a contrasting color from the fabric color. It’s super helpful to see your quilting stitches rather than have them match perfectly with the fabric color.
The way I see it, if you can't see your stitches, you can't really improve!
I always use the same color thread in the top and bobbin of the machine. This also also reduces tension issues and stops you from getting little pops or dots of the wrong color on one side of the quilt or the other.
I also wear quilting gloves to help get a grip on the quilt and moved it smoothly through the machine. I find when I don't wear gloves I struggle to grip the quilt without clinching the layers in my fists, which can make my hands hurt after a length of time.
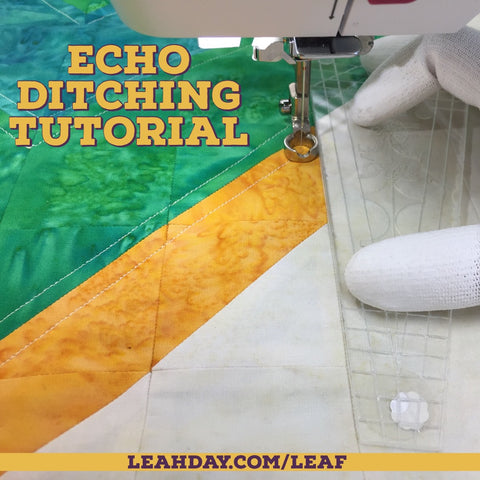
Echo Ditching the Leaf Peepers Quilt
Echoed ditching is my new favorite way to begin the quilting process. Instead of stitching right in the ditch, you quilt 1/4 inch away from the ditch.

This is much easier than stitching in the ditch and more forgiving. I use the long straight edge of the Slice Quilting Ruler lined up along the seam line on the quilt to create the lines quickly and easily.
In order to use the Slice Ruler, you have to use a ruler foot. This is a special foot that has a tall, circular base that's exactly 1/2 inch in diameter. With the needle in the center position and a ruler placed along the edge. You will quilt exactly 1/4 inch away from the ruler.
Please don’t try this without a ruler foot. Regular darning feet do not have a high base and will easily hop on top or scoop below the ruler. What will happen next will scare the pants off you as your needle crunches right through the edge of your quilting ruler!
I quilted within each color area of the Leaf Peepers Quilt using echoed ditching and Isacord Vanilla thread. This stabilized the quilt and allowed me to take out lots of pins and Pinmoors, and provided the beautiful frame for each design with in the leaf blocks.
Ruler Foot Quilting Alternative
If you don't have a ruler or ruler foot, you can still do echo ditching with walking foot quilting. Mark the lines 1/4 inch away from the seam lines and simply follow the lines with your walking foot.
We had a new Deluxe Foot set which comes with two walking feet, a ruler foot, open toe darning foot, and a variety of snap on presser feet. Click Here to check it out!
This also isn't the only way to quilt the Leaf Peepers Quilt. Sheri is quilting her leaf blocks entirely with walking foot quilting. Click Here to check out her tutorial.
Let's go quilt,
Leah Day
Quick links to all the posts for the Leaf Peepers Quilt Along:
Week 1 (August 13): Piecing Tips
Week 2 (August 20): How to piece Block 1
Week 3 (August 27): How to piece Block 2
Week 4 (September 3): How to piece Block 3
Week 5 (September 10): How to piece Block 4 and a Basting Tutorial
Week 6 (September 17): Quilting Part 1
Week 7 (September 24): Quilting Part 2
Week 8 (October 1): Quilting Part 3
Week 9 (October 8): Quilting Part 4
BONUS! (October 15): How to Wash Your Quilt


3 comments
Great videos, thank you. I noticed that the straight pins used to secure that quilt sandwich have a plastic/cork type of cover for the pointed end of the straight pins. Tried to purchase them from you but didn’t find them listed. Found a company on the internet, Pinmoor, and placed an order, Jan 21, 2024. To date haven’t heard a word about the order. Where did you purchase the pin covers? Would appreciate a response. Thank you, Cathy Hornsby 562 5472003.
Great question April! Yes, I put the slider over the feed dogs with the hole centered over the needle hole in the machine. Yes, the feed dogs will bounce up and down with stitch length set at 0, but they will not feed the quilt forward. The slider will get a bit of wear in that area, but it will not impact how the tool works under your quilt.
The more damaging issue is when the slider shifts as you’re quilting and gets stitched to the back of your quilt. Please tape down the edges until you’re very used to using it and know how the quilt is supposed to feel as it moves over the table – smoothly with no friction. I hope that helps!
I have a question about the supreme slider. In the video you say that you do not put your feed dogs down and your stitch length to 0. Do you put the supreme slider over your feed dogs (there is a hole for the needle) or where do you put it?
Thank you,
April