Welcome back to the Machine Quilting Party! I have a super simple quilting design to teach you today. If you like straight lines, you will love quilting Pinstripes. This design adds a beautiful, elegant texture to your quilts and it's super easy to quilt.
Learn how to quilt Pinstripes in this new walking foot quilting tutorial:
Click Here to find the book Explore Walking Foot Quilting with Leah Day. Inside you'll find 30 fun walking foot quilting designs with tips on how to use them in real quilts. This book also includes the quilt pattern for Marvelous Mosaic, the quilt we're making together with these squares!
Affiliate: I also used 1/4-inch masking tape to mark the narrow lines of Pinstripes. I found this tape on Amazon right here.
Tips for Quilting Pinstripes with Walking Foot Quilting
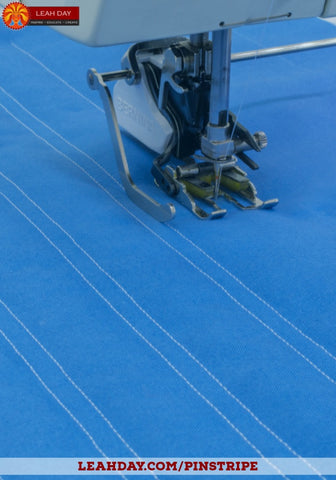
The Pinstripe effect is created by spacing straight lines closer together, then further apart. In the video I spaced the lines 1/4 inch apart then 1 inch apart. If you don't create a noticeable difference in the spacing, you might not achieve as noticeable an effect.
The easiest way I found two space the lines was to use 1/4 inch masking tape to space the shorter distance and a guide bar on my walking foot to space the wider distance.
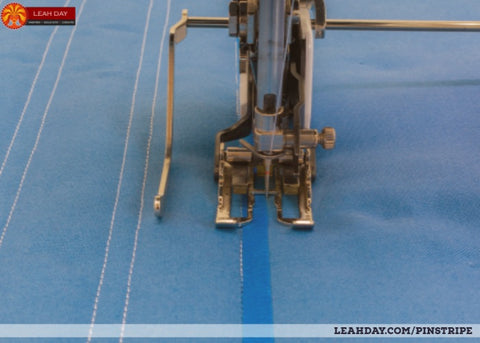
You can also use the marks on your walking foot as a guide. I have trouble seeing the 1/4 inch marks on my foot so the masking tape worked better for me. You could also mark all the lines of the design on your quilt using a marking pencil.
No, marking lines on your quilt isn't cheating! If it makes quilting the design faster and easier, that's the best way to do it.
Just a quick reminder about my machine settings:
For walking foot quilting I always set the stitch length to 1.5 mm and place a Queen Supreme Slider on my sewing table to the left of the feed dogs like so:

However, for this Marvelous Mosaic Quilt, I have Minky fabric on the back which likes to grip the machine and table. When using this fabric on the back, I increase the stitch length to 2.5 mm.
What's that weird thing on top of my machine? That's a small magnetic pincushion and a cheater needle. I keep those handy for tying off and burying loose thread tails as I quilt. Click Here to check them out.
Quilting from Edge to Edge
I quilted Pinstripes in this design straight across my quilt sandwich. I started off the edge of the fabric and quilted across the square into the batting on the other side.
Quilting this way is a lot faster because you don't have to stop and fiddle with the placement of your quilting guide. But it will create a lot thread breaks. Thankfully you don't have to tie off or bury these thread tails because they're in the batting area.
If you're worried about these broken threads on the edges of your quilt square, please check out the video on preparing your quilt for binding. After all the blocks are quilted, we're going to secure all of the thread tales with a Victory Lap before connecting them together.
Slow down Leah!
You might notice in this video I was really putting my foot down and racing through these lines. When I've been quilting for a few hours, I tend to speed up and push the limits of what my walking foot can handle.
Walking foot is meant to walk so if you notice your stitches getting bigger that's a sign you might want to slow down and let your walking foot do its job feeding the quilt slowly and making perfectly spaced stitches.
Free Motion Quilting or Walking Foot Quilting?
I've also quilted Pinstripes with free motion quilting and you can see how this works in this quilting tutorial:
As you can see, this was a bit harder because when free motion quilting we use a darning foot. I could space out the narrow spacing using a little prong on my darning foot as a guide, but I had to mark the wider spacing so it would remain consistent through the square.
Which method of quilting is best? It really depends on your preference. If you're in the mood to let the machine do the work for you then use walking foot quilting. You may spend more time rotating the quilt and shifting it through your machine, but you won't have to worry about the size or spacing of your stitches.
I used walking foot quilting to quilt Pinstripes in the background of the Mega Pinwheel Star Quilt. I believe the walking foot made this faster and easier because I could use the wide base on the foot and the guide bar to space the lines perfectly. The walking foot also helped feed the bulky quilt evenly through the machine.
Had I quilted this quilt with free motion quilting I would've had to mark every line of Pinstripes on the quilt first. My lines may have wobbled and weaved too because quilting straight lines with free motion quilting is harder.
But sometimes free motion quilting feels easier when it comes to moving and shifting the quilt through the machine. If you don't want to wrangle your quilt in weird directions or have to break thread more often because of the direction of your lines, and free motion quilting might be a better choice.
No matter which way you stitch it, Pinstripes is a fun way to add beautiful texture and easy straight lines to any quilt!
Ever heard of a machine quilting sampler quilt?
That's what we're making with Marvelous Mosaic!
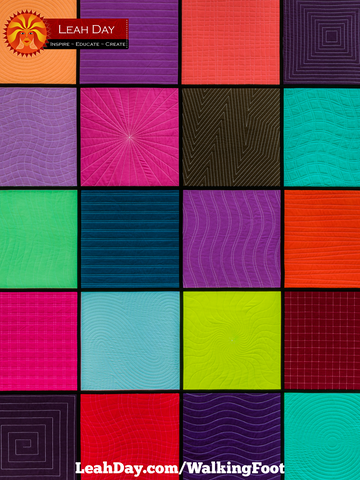
We're quilting all 30 designs from the book Explore Walking Foot Quilting with Leah Day and we're going to connect together the best 20 to create the Marvelous Mosaic Quilt.
Click Here to find all the walking foot quilting videos I've shared so far. We're making three quilts together from this book and you can join in the fun and follow along anytime!
Let's go quilt,
Leah Day
Find more walking foot quilting tutorials by clicking the links below:
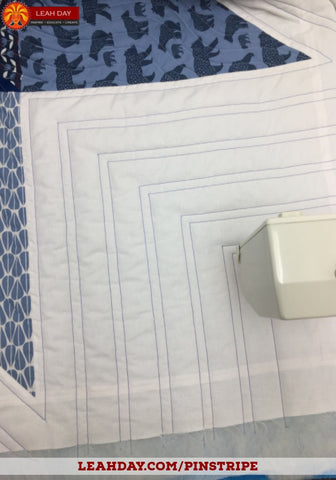
How to Quilt Concentric Squares
How to Quilt Pinstripe Gridlines
How to Quilt Concentric Circles


