This week we’re tackling one of the prettiest machine quilting designs I’ve created so far. River Path is basically simple curving lines, but thanks to the foundational nature of this design, it can be so much more interesting than that. Learn how to quilt River Path with walking foot quilting in this new tutorial:
Quick Links to things in this tutorial:
Tips for Machine Quilting River Path
River Path is quilted very similarly to curving lines. The difference comes in on how you think about it. Start by planning a foundational line – draw a single, wiggly line over your quilting space. This line will set the stage for your quilting texture so take some time to plan it out and make it nice and curvy.

To begin quilting, quilt on that foundational line first. With that knocked out, now the only thing you need to do is travel stitch and echo it. When you begin quilting the echoes this design really starts to get interesting and the texture of your foundation really starts to stand out.
Where will River Path work best in your quilts?
I used River Path as the main design in the Infinity Knot Quilt. This is one of my favorite quilts from the book Explore Walking Foot Quilting because it gives you so many creative spaces to play with different quilting designs.

Find this quilt pattern and quilting design instructions in the book Explore Walking Foot Quilting with Leah Day.
I first marked River Path in the center black and white knot section. This was hard to manage because this area was pieced with black and white fabric so I had to use two different marking pencils to mark the design!
Then the quilting began. This was honestly one of the weirdest quilting experiences ever because the knot section turned in two different directions. Ultimately I fell back on my main advice for quilting – stitch from the center. I pulled up thread in the center of the knot, then quilted down and around one side. Then returned to the center to stitch the opposite side.
Sometimes this wasn’t in a clockwise direction which made quilting this thick, fluffy quilt a challenge. But the nice thing about quilting with 1 inch of space between the lines of quilting is it doesn’t take too long to quilt the entire area.
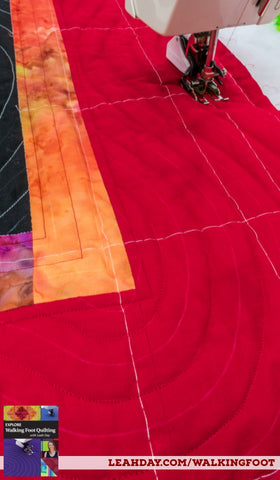
I also filled the border of Infinity Knot with River Path as well. This was much easier to quilt because it was right on the edge and I could run up against the edge of the border to travel stitch along it as well.
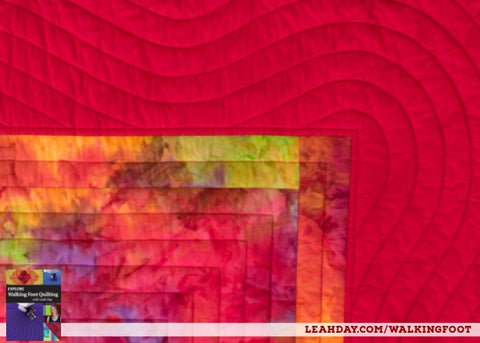
Yes, you can use just one single design like River Path to quilt your whole quilt!
How to Free Motion Quilt River Path
You can also easily quilt River Path with free motion quilting too. Here’s the original free motion quilting video I shared for River Path back in 2010:
Which type of quilting is easier? Both will require practice and patience to master. It takes time and quilting a lot of wobbly echoes before you can quilt smooth, consistently spaced echoes like this with free motion quilting.
So please try both types of quilting so you can see the difference and build skills for both types of machine quilting!
Would you like to create a big, beautiful quilt AND learn how to machine quilt lots of different designs? Then you should join in the fun and make the Marvelous Mosaic Quilt with me!

We're quilting all 30 designs from the book Explore Walking Foot Quilting with Leah Day and we're going to connect together the best 20 to create the Marvelous Mosaic Quilt. Find the quilt pattern and detailed instructions in the book, available in the following formats:
Click Here to find all the walking foot quilting videos I've shared so far. We're making three quilts together from this book and you can join in the fun and follow along anytime!
Let's go quilt,
Leah Day
Find more walking foot quilting tutorials by clicking the links below:
How to Quilt Concentric Squares
How to Quilt Pinstripe Gridlines
How to Quilt Concentric Circles


1 comment
Wonderful ways to quilt all different shapes and sizes. I shall be giving it ago. Thanks for sharing.